Sunday, August 29, 2004

A Funny Thing Happened…


I was trying to find Gulf shrimp yesterday and had to visit several grocery stores before I was successful. In the morning, before I had begun my quest, I stopped in at my regular grocery store to get a couple of things. It was apparent after I entered the store that the power had gone out. While this particular grocery store is equipped to remain open when there is a power outage, the low lighting was a give-away that something was amiss. Later in the afternoon when I set out in search of Gulf shrimp, I decided to avoid that store because of the power situation. I went to a nearby Whole Foods, but as I started to get out my car an employee who was sitting outside called out to me that the store was closed. They were not set up to continue operations without power and in fact had resorted to moving all the meat onto a refrigerated truck. I drove over to another Whole Foods store but they didn’t have Gulf shrimp. Next stop was a gourmet store about fifteen miles from my house. I parked, and entered the store. That is, I entered through the first automatic door, but the next door did not open for me. Then I noticed it was dark inside. Would you believe the power had gone out at just the moment I was entering the store? Thankfully, it turned out not to be the east coast blackout that I feared and I finally did find some Gulf shrimp.

So why did I want Gulf shrimp? Well, let me back up a little. As you may know if you’ve read some of my earlier posts, seafood is not something I usually eat. My comfort zone for seafood is pretty much limited to canned tuna. I’m currently reading Jeffrey Steingarten’s The Man Who Ate Everything and am intrigued by his notion that you can rid yourself of a food aversion by eating the food eight to ten times at moderate intervals. I decided to start with shrimp, which strikes me as a lesser evil when it comes to seafood.

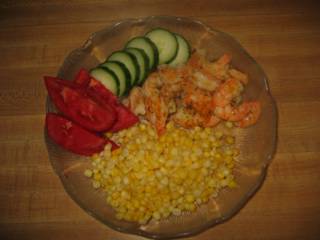
I dragged out a number of my cookbooks to read up on how to buy and prepare shrimp and to find a recipe that sounded appealing. I learned that most shrimp is either frozen or has been frozen, so chances are when you see something called fresh, it isn't really. I also learned that the preferred varieties were from the Gulf of Mexico. So, as recounted above, I decided to look for Gulf shrimp. I think next time I will buy whatever kind Whole Foods has. I did finally find Gulf shrimp, but I’m pretty sure it was not as fresh as it ought to have been.

The recipe I settled on was a very simple one from Mark Bittman’s How to Cook Everything. The shrimp were roasted in a hot oven with olive oil, rosemary, freshly-squeezed orange juice and some orange zest. I was encouraged by the aroma from the oven as they cooked – it smelled pretty good. Actaully, for a first try at eating a food I don’t like, it went well – I ate the full portion that I had served myself. The shrimp were subtly flavored with orange and rosemary, but I think I would have preferred something bolder. Next time I plan to try Shrimp Fra Diavolo with Linguine, which, with tomatoes, wine, and lots of hot pepper, should fit the bill.


Friday, August 27, 2004

Strike two!


sourdough sponge

I tried to make sourdough bread again last weekend. I had better luck with the sponge this time, but that was it for the good news. I repeated a mistake from last time – I started too early in the day. I did it without thinking, but then I decided that I would just let the sponge rise for a really long time (the recipe says to let the sponge rise for at least 8 hours or overnight). I got started somewhere between 10 and 11 in the morning. I checked my sponge before going to bed and it was really bubbly. I was very optimistic at that point – this was much different than last time.

In the morning I found that the sponge was still very bubbly, but that it had deflated somewhat from the previous night. The picture above was taken after I had stirred the sponge down, but even then it was bubbly.

It was downhill from there. I added more flour and some salt to make the dough and then left the dough to rise. The first rise was supposed to take an hour or an hour and a half, but I left it quite a bit longer. I checked it from time to time but there was little progress. At some point I decided to go ahead and shape the loaf and start the second rise. I tried putting it in a slightly warm oven, but it did nothing. I let it go for several hours, but there was no sign of life. I decided not to bother with baking it.

I’m going to give it one more shot – I’ll let the sponge rise for 12 hours or so and see how it does. I’m also tempted to try it without the salt. After that, unless I get a decent loaf of bread, I think I’ll be tossing the starter – either that or start charging it room and board.

Wednesday, August 25, 2004

Any Ideas?


I tried something new the other day, but can’t say I was especially taken with it. Jicama was on sale in the grocery store and looked pretty good (well, as good as a big brown lump can look), so I decided to buy one. I’d had it in the refrigerator over a week before I finally got around to using it. At that point it had started to develop some serious pock marks, so time was running out.

Coincidentally, I had some jicama served to me in a salad Friday evening. Until then I had thought that I had never eaten jicama before, but now I would say it’s very likely that I've had it in a salad before. On Friday, I saw it on my plate and thought it might be jicama but had to check with the waitress to be sure. If you’ve never had it, it’s a wet crunchy vegetable. Someone I work with described it as a “radish with no flavor”, which is a fairly apt description. Anyway, the salad with jicama reminded me that I had one sitting in my refrigerator that needed to be used.

I had spent a little time looking around on the internet for recipes, but had not yet found anything that really grabbed me. I recalled that there had been a sign in the grocery store that said jicama was traditionally eaten with lime and chile. I had both of these on hand and was in a hurry to dispense with my jicama, so it appeared I had myself a recipe.

I decided I would shred or julienne the jicama on my fearsome mandoline. My brother originally bought this mandoline for himself, but was a little afraid of it and never got around to using it. He gave it to me, but I was a little afraid of it and never got around to using it. Finally, when he was staying with me and we were cooking together we used it. You should have seen us reading and re-reading the instructions and tip-toeing around that thing. We finally got it set up and made some wonderful potato galettes with impossibly thin slices of potato.


the underbelly of the mandoline...eeek!

But I digress. So... I got some much needed practice with my mandoline and shredded a bowlful of jicama. I then whizzed together the jalapeno pepper with the juice from the lime in a mini food processor and tossed that with the shredded jicama.

It was OK…but no more than OK. In case I’m ever moved to buy another jicama, do you have a favorite recipe for it?

Tuesday, August 24, 2004

Meatballs with white wine, lemon & bay leaves


Not all my efforts in the kitchen this weekend were completely in vain. I made these meatballs following a recipe in Clarissa Hyman’s Cucina Siciliana, and I thought they were delicious.

It is a beautiful book filled with pictures and stories of Sicily. I have browsed through it, lingering over the pictures and checking out the recipes, but have not yet had a chance to read much of the narrative. The recipes seem a little less precise than those you normally see in books and magazines, calling for a glass of wine, a “good glug” of marsalla, or a handful of mint leaves, but perhaps this is truer to the original recipes.

There were two things I especially liked about this recipe even before I had a chance to taste the meatballs. First, it makes a small quantity – it uses just 9 ounces of meat and makes about 15 smallish meatballs. I think the recipe could easily be doubled, but this quantity is enough for three meals for me. I also liked the way the meatballs were cooked – it looked easy and sounded yummy. The meatballs were shaped into slightly flattened rounds, browned on both sides (I get really frustrated trying to brown round meatballs!) and then simmered in wine, water, bay leaves, and (at the last minute) lemon juice. The cooking liquid is reduced and ultimately becomes a wonderful pan sauce that coats the meatballs.

I had to make two emergency substitutions, but the meatballs seemed to be none the worse for it. I thought I had dried bread crumbs on hand – but I was wrong. I considered substituting fresh bread crumbs but then remembered my Mom used to use saltine cracker crumbs when making meatloaf. I crushed 14 crackers in a plastic bag using my rolling pin and ended up with just over the ½ of cup of crumbs called for in the recipe. I didn’t add any salt since the crackers were salted. I also found that the only white wine I had on hand was the tail end of a bottle of white zinfandel – not exactly what you would expect to find in a Sicilian kitchen! But it all worked, and worked well. The meatballs were easy to handle, easy to cook, and fantastic to eat!

Monday, August 23, 2004

A Peek Behind Closed Doors

Pim put it so well, “Living and blogging are not quite in harmony at the moment.” But to make matters worse, events in the kitchen have conspired against me as well.

I didn’t spend much time in the kitchen last week, and so had nothing to blog about. I had hoped to remedy that this past weekend. I spent time on several cooking projects, thinking I would get material for at least two or three posts. Unfortunately, I had little success and no pretty pictures (thank goodness I wrote my IMBB post last week!). I may still write of the failures and less-than-noteworthy efforts of last weekend, but tonight I’ve decided to do a mini exposé of my kitchen.

I hope you will not be too distressed by the disarray you are about to see. I did not straighten any shelves before taking these pictures. I also took a few close-up pictures so you could read some labels (as I would want to do). I’ll be back cooking soon.


my "pantry" - actually a pie cupboard


pantry - left middle shelf


pantry - top left shelf


cupboard to the right of the sink


cupboard - top left shelf


cupboard - bottom right shelf

Sunday, August 22, 2004

IMBB7 - Peach Melba Dumpling


Today is the seventh round of Is My Blog Burning, the now famous cooperative blogging event that was the brainchild of Alberto of Il Forno. The current edition is hosted by marine ecologist and foodie Jarrett of food porn watch and life in flow and the theme is You’re just the cutest little dumpling!

I struggled with this IMBB mostly because I wasn’t sure about the definition of a dumpling. At first I was thinking of making some sort of sweet ravioli, but there seemed to be some question as to whether ravioli qualified as a dumpling. Finally, I settled on something along the lines of an apple dumpling. (It’s called a dumpling so it must be a dumpling – right?)

The peaches are wonderful right now, so I decided to use a peach in the middle rather than an apple. Then I thought a raspberry sauce would make a pretty and tasty accompaniment, so my dumpling became Peach Melba Dumpling.

I started with my standard pie crust recipe and added some sugar and lemon zest to give it a little flavor. I also cut back on the salt. I was very happy with the way the pastry turned out – it looked good and tasted good too. I think I might change the way I rolled it out though. I rolled it as one piece, but I think it would be easier if the dough was divided first and then each piece could be rolled out separately to the appropriate size.

The other thing I might do differently next time is the filling. I had some marzipan in the refrigerator and I’m wishing I had tried that instead of the nut and sugar mixture. It would have been neater – the marzipan could have been shaped into a peach pit-sized nugget – but I think it might have also provided a more intense flavor in the middle.

Overall, though, I was very happy with the way these turned out. They were yummy and photogenic too!

Peach Melba Dumpling

zest from one lemon
1 cup flour
2 tbs confectioners’ sugar
¼ tsp salt
1/3 cup shortening
3 tbs water
2 tbs ground almonds
1 tbs brown sugar
¼ tsp cinnamon
2 or 3 freestone peaches
1 egg
sparkling sugar
melba sauce (recipe follows)

Finely chop the lemon zest. Whisk together the flour, sugar, salt, and lemon zest. Cut in the shortening with a pastry blender. Sprinkle the water over the mixture and stir. Pull the dough together into a ball with your hands. You may wish to divide the dough before rolling it. Roll out the dough between sheets of wax paper and then place on a cookie sheet and refrigerate briefly.

Mix together the ground almonds, brown sugar and cinnamon.

Prepare the peaches by cutting them in half, peeling, and removing the pit.

Place a piece of pastry on the cooking dish and then place half of a peach on top of it with the cut side of the peach facing up. Spoon a little of the nut and sugar mixture into the center of the peach and then place the other peach half on top. Pull the edges of the pastry up around the peach and pinch at the top. Repeat with the other peach(es). Beat the egg lightly in a small dish and then brush the dumplings with a little of the beaten egg. Sprinkle with sparkling sugar. Bake at 400 F for about 40 minutes. Shield the top with foil if it is browning too quickly. Let cool and serve with Melba sauce and additional raspberries.

Melba Sauce

½ pint fresh raspberries
2 tbs sugar (or to taste)
juice from half a lemon

Place raspberries, sugar and lemon juice in the blender and puree. Strain out seeds.

Sunday, August 15, 2004

Gorditas


They were good!

After a morning of making tortilla masa, I spent the evening making gorditas. The recipe was from Diana Kennedy’s From My Mexican Kitchen: Techniques and Ingredients.


The salsa verde was very easy. It is made with tomatillas, those little green tomatoes in the papery husks. The tomatillas are boiled for a few minutes and then pureed in the blender with chiles, cilantro, garlic and salt. The resulting sauce is tangy, spicy and very green!


The technique for making the shredded beef is easy, but time consuming. The recipe calls for either skirt or flank steak – I used flank. The steak is cut into cubes and simmered with onions and garlic, and then shredded. I started out using two forks but I found it was easier to pull it apart with my fingers. Either way, it is slow going. The shredded beef is mixed with onion and cilantro to form the filling.

With the other components ready, the moment of truth had arrived – it was time to turn the tortilla masa into dough and form and cook the gorditas. The dough is made of the tortilla masa, a small amount of lard, and some salt. I had decided that my tortilla masa was a little dryer than it should be, since it weighed about four ounces less than it was supposed to, so I also added a little water to the dough. I mixed it in the mixer with the paddle to make sure the lard was well distributed and then used my hands to pull the dough together into a ball.


I formed and cooked the gorditas without much trouble, although I didn’t get the nice brown spots pictured in the book. I don’t understand how she got that color cooking on low heat as instructed in the recipe! After the gorditas were cooked, I split them open about three quarters of the way through. I was amazed that they didn’t crumble to bits at this stage, but they held together. Just before eating, I reheated the gorditas in a little lard, stuffed them and topped them with salsa. Eating them was a messy affair, with the filling falling out every which way and the salsa dripping all over, but they were good!

Saturday, August 14, 2004

Making Tortilla Masa

Have you ever started a recipe not quite sure your skills and/or your patience would be up to the task? When I started making this tortilla masa last night, I was thinking the project could easily turn out to be a disaster. Actually, as I write this I’m thinking it may be a bit premature to declare a victory.

My molino arrived earlier in the week. You may recall that I had planned to make tortilla masa earlier, but then realized that I was not equipped to grind the corn. I ordered a molino – a corn grinder – from GourmetSleuth.com, hoping that it would do the trick. I’m still not entirely convinced that it is the appropriate device to grind corn for tortilla masa. My guide for this endeavor, Diana Kennedy’s From My Mexican Kitchen: Techniques and Ingredients, characterizes the molino as something used to grind a dryish masa for certain types of tamales. I’m not making tamales. Anyway, I plunged in last night and hoped for the best.


dried corn

The first few steps were easy enough. I weighed out two pounds of dried corn, picked it over, rinsed it, and then put it in a stainless steel pot and covered it with water. After the water came to a boil I added a little slaked lime (calcium oxide) and cooked the mixture for about 15 minutes. When the lime is added, the corn turns a deep golden color. The corn should be cooked just until the skins slide off easily. After about 12 minutes I tested a piece and found that I could peel the skin off, but I wouldn’t go so far as to say that it slid off easily. I let the corn cook another couple of minutes and then took it off the heat, since 15 minutes was the recommended cooking time and I feared I might overcook it. I then left the corn, which at this stage is called nixtamal, to soak overnight.


nixtamal that has soaked overnight

This morning I checked on the corn and found that the skins had not just loosened up, they had turned to slime. Removing them turned out to be much easier than I had anticipated. I started out rubbing the corn kernels with my fingertips under running water, but I had slippery kernels skittering off in all directions. I finally found a method that worked for me – I took a small handful at a time and rubbed them between the palms of my hands under running water. Doing this over the colander that held the rest of the corn prevented the escape of any wayward kernels. After the skins are rubbed off the corn is referred to as nixtamalizado and is ready for grinding.


nixtamalizado

Unfortunately, I do not have a work surface in my kitchen that I can clamp the molino to. There is not enough of an overhang on my counter, and my kitchen table is made of soft pine. Fortunately, I do have a suitable table in the basement. I cleared it off and cleaned it up, clamped the molino to it, and started grinding. I had been afraid that this stage might be tough-going, but it wasn’t bad. Of course, it’s possible I didn’t have the grinding plates as tight as they should have been! It took somewhere between 20 and 30 minutes to grind all the corn.


the molino with the nixtamalizado in the hopper and the finished tortilla masa in the dish

I plan to use some of the tortilla masa this evening to make Gorditas and will freeze the rest. Was the masa properly ground? Will the gorditas fall apart in the pan? Will they taste good? Was all this worth it? Stay tuned…

Friday, August 13, 2004

Dinner Tonight


These are Alice’s Black Bean and Corn Patties. I made them for dinner tonight and they couldn’t have been easier. In fact the hardest thing about making them is lugging out the food processor. I was a little worried that they would be hard to handle, but the patties held together very well.

I followed Alice’s recipe without any modifications, but as she suggests you could do all sorts of variations on this theme by changing the beans and/or vegetables, not to mention the herbs! I’ve tried those frozen Boca Burgers before and just couldn’t get excited about them. Not so with these, they are delicious! They are just a little crisp on the outside, moist on the inside with a little crunch from the corn and onion, and ever so slightly sweet from the corn and cornmeal. Thank you Alice!

Monday, August 09, 2004

117 down, 96 to go…


I had a cookie mini-marathon today. I mixed up four batches of cookies and baked off two. I’ll bake the others tomorrow night. They’re for a meeting at work on Wednesday.

I used three different recipes – all old favorites. The chocolate pecan pie bars pictured above are from a 1989 magazine ad for Baker’s chocolate and Karo syrup. The sugar cookies that are also in the picture and the two batches of Cobblestone cookies that I haven’t baked yet are both from my favorite cookie cookbook, Maida Heatter’s Book of Great Cookies. I have made many of the recipes in this book and I’ve never been disappointed in any of them.

Maida Heatter’s recipes are detailed, but in a way that is helpful rather than complicated. For instance, a trick I learned from one of her recipes I use when making the chocolate pecan pie bars. If you line the pan with foil, you can lift the entire sheet of cookies out of the pan before cutting them into bars. This makes cutting easier and neater.

The Cobblestone cookies are chewy spice cookies that are loaded with raisins and walnuts. They are a slice and bake cookie with a twist: you spread the dough in a sheet pan and then cut them into bars. You end up with a thick rectangular cookie that is absolutely wonderful.

If you like making cookies, you need this book!


Saturday, August 07, 2004

Making Macaroni


Not too long ago I was given a set of pasta maker plates for my Kitchenaid mixer. This mixer has an amazing variety of attachments available, including a grain mill, a juicer, a can opener, and even an ice cream maker. The pasta maker plates are designed to be used with the food grinder attachment – the one attachment that I have.

I had made spaghetti before and was really pleased with the way it turned out. Tonight I decided to try making macaroni. It’s a very simple process, though I little time-consuming. A basic egg noodle pasta recipe is provided in the instruction manual. I haven’t worked up the courage to deviate from it yet - I’m not sure if just any pasta recipe would work


Once the dough is mixed, kneaded, and has rested, the fun begins. Anyone who ever lusted after the Play-doh Fun Factory as a kid will understand! You drop walnut-sized lumps of dough into the hopper of the food grinder and pull away lengths of pasta as they are extruded. With the macaroni, the instructions advise you to pull it off in approximately 6-inch lengths. These long pieces should be laid on kitchen towels to dry a bit, and then you can break or cut them into shorter lengths before cooking.

I think the spaghetti was possibly better than dried pasta, but I wouldn’t say the same for the macaroni. It was good – but no better than dried. But making homemade pasta isn’t just about taste, it’s about having fun.


Friday, August 06, 2004

My Little Garden


Actually, until a couple of hours ago it was my little weed patch. In years past I have had a vegetable garden, but I have given up feeding the deer. I now grow just herbs (which for some reason they’re not interested in). I haven’t kept up with the weeds, because I can’t bear being out in the sticky hot weather getting eaten by bugs. But today is different.

Normally the weather in August is hot and humid, but today is almost fall-like. There is a wonderful breeze; the sky is blue with puffy white clouds; and the air is cool and dry. It’s the kind of day that when you go outside for lunch, you wish you didn’t have to go back to the office. Lucky me, I’m not at the office!


So I spent an hour or two pulling up weeds, mowing the lawn, and reveling in the gorgeous weather. As I was pulling weeds, I noticed I have quite a menagerie out there. I saw a big old slug, a fuzzy white caterpillar, ants, stink bugs, Japanese beetles, crickets, and various other non-descript beetles, bugs and flying things. They left me alone, so I left them alone (well, except for that slug which I relocated with little regard for his comfort or safety).


Now I can see the herbs again. The basil, sage, and rosemary seem to have come through the ordeal unscathed. The thyme, chives, and especially the tarragon were overshadowed by the weeds and haven’t grown much. Hopefully, with a little sun and belated TLC they will be thriving soon.

What a day!


Thursday, August 05, 2004

Summer’s Bounty Pot Pie


When I read Clotilde’s post about her birthday dinner the other day, I was reminded of her Broccoli and Cornmeal Upside Down Cake which had sounded so good to me when she first wrote about it

Originally, I was thinking that I would create some sort of cornmeal upside down cake like Clotilde’s, but with tomatoes, corn, and chile peppers rather than broccoli. I thought that the tomatoes might be a little wet for this arrangement, though, and was also concerned that the leftovers might not keep well. So instead, I decided I would prepare something like a pot pie – a stew-like mixture of tomatoes, corn, chiles, onion, and black beans crowned with a circle of cornbread.

I’m really happy with the result. It tasted great and was very filling. The amounts of the fresh ingredients were based on what I had on hand as much as anything. You could vary both the types of chiles and the amounts according to your taste and what you have available. I ended up with about three servings and some extra cornbread.

Summer’s Bounty Pot Pie

Filling:
1 tbs olive oil
1 onion, chopped
2 Anaheim chiles, chopped
1 Poblano chile, chopped
2 cloves garlic, minced
1 ½ cups corn, cut from the cobs
2 ½ cups tomatoes, skinned, seeded and chopped
15 ½ oz can black beans
1 cup water
¾ tsp salt (reduce or eliminate if using canned tomatoes)
1/3 cup chopped cilantro

Cornbread top:
1 cup cornmeal
1 cup flour
¼ cup sugar
2 tsp baking powder
½ tsp salt
1 cup skim milk
¼ cup canola oil
1 egg
1 cup of onion and chile mixture, reserved from filling

Preheat the oven to 400F.

Heat olive oil in a large non-stick saut̩ pan over medium high heat. Add onion, chiles and garlic to pan and cook, stirring often, until softened Р5 minutes or so. Remove about one cup of the mixture and set it aside for use in the cornbread. Add the corn to the pan and stir for a couple of minutes. Add the tomatoes, black beans, water, and salt and bring to a simmer. Reduce the heat to medium low while you make the cornbread.

Prepare a 13x9 inch pan by spraying it with cooking spray and lining it with parchment. The parchment should cover the two long sides of the pan and the bottom.

Stir the dry ingredients together in a large bowl. Beat the egg lightly in a small bowl with a fork. Stir in the oil and then the milk. With a rubber spatula, stir the wet ingredients into the dry ingredients just until blended (there may still be a few lumps) and then stir in the onion and chile mixture. Scrape the batter into the prepared pan and spread it into a smooth layer. Bake for about 20 minutes.

While the cornbread is baking, add the cilantro to the filling. Stir it in and leave it to simmer a minute or two. Then place about 1 ½ cups of the filling (be sure to include some of the liquid) in a blender and puree. Pour the pureed mixture back into the pan. If the filling is too thin, let it continue to cook at medium low. When it has reached the desired consistency, cover the pan and remove it from the heat

When the cornbread is done, use the parchment paper to lift the cornbread out of the pan onto a rack. Use a biscuit or other ring cutter to cut circles of cornbread. Ladle the filling into bowls and top each with a round of cornbread.

It’s a Loaf!


I had thought I would be writing this post last night, but I was up until one in the morning waiting for my first sourdough loaf to come out of the oven. When it did, I put it on a rack and fell into bed. I cut into it this morning with low expectations. It is a dense, sodden lump within a chewy crust and is barely edible. Yet, I am inexplicably optimistic that next time it will be better.

I should explain that I am currently “on vacation”. I am off from work most of this week and Monday of next week, but I have no plans to travel. Instead, I am puttering around the house with different projects (including the sourdough) and just enjoying a slower pace.

Yesterday was Day 5 for my sourdough starter. It was bubbling, but not very vigorously. On Day 5 my instructions said I should discard half of the starter and feed the remaining part with ½ cup of water and 1 cup of flour. I took 1 cup of the discarded starter and added flour and water to form a sponge for my sourdough loaf. The sponge was to proof for at least 8 hours or overnight. Unfortunately, I hadn’t planned well. In fact, I couldn’t have picked a worse time to start. It was about 10:30 in the morning and I had a feeling it was going to be a late night.

There was no guidance in the recipe about how to judge when the sponge is ready. Mine had some surface bubbles, but I’m not sure how much it had increased in volume. After dinner, I decided it was now or never, so I added the salt and the rest of the flour, kneaded it, and put it in an oiled bowl for the first rising. It was supposed to double in volume, but I’m pretty sure mine didn’t. I gave it an hour and a half and then pressed the air out of it, shaped it into a round loaf, and put it into a basket lined with a floured kitchen towel. I think the second rising may have been less successful than the first. Again, I gave it about an hour and a half, but it was after midnight and I could barely keep my eyes open, so I wasn’t waiting any longer.

I did have one small triumph in this whole process – I successfully transferred the uncooked loaf from the peel to the baking stone. My earlier attempt at doing this was a disaster. This time I used coarsely ground corn meal (polenta) on the peel and the bread slid right onto the stone. It probably helped that it was a small, dense loaf.

I toasted a slice of the bread this morning for breakfast. It has that distinctive sourdough taste, but it is just too heavy and dense. I am hoping that the starter will strengthen over the next couple of weeks, so that when I try again it will be a little more vigorous. Also, I know now that I should start in the evening so that the sponge can proof overnight. I measured my loaf (eighteen inches around) so I will be able to gauge the relative success of my next loaf. Hopefully, more time, a stronger starter, and a little experience under my belt will result in a better loaf.

Tuesday, August 03, 2004

It’s Alive?


I do believe that's a bubble! (dark spot on the edge)

I started a starter – or I’m hoping I have. Today is Day 4, which is a make or break day for the starter. I’ve been following the directions given in Nick Malgieri’s book, “How to Bake”, and on Day 4 he tells you that if the starter has not begun bubbling, you should start over.

When I started, I was a little worried about what might take up residence in that blob of dough. I hunted around on eGullet a little and am now reasonably reassured that the good bugs (i.e. wild yeast and “friendly” bacteria) will win out over the bad. Apparently the acidic environment that is formed is inhospitable to the things you don’t want, including commercial yeast.

What is interesting but confusing is that there are so many conflicting instructions for starting sourdough out there. The only things they all seem to have in common are: flour, water, and periodic feedings. The proportions vary - mine is one part water to two parts flour but many are equal parts. The timing varies with some calling for feedings as frequent as eight hours apart. Even advice on temperature varies – Nick Malgieri calls for room temperatures between 60 and 75F, but many others call for warmer temperatures. I turned down my thermostat for that little blob!

So today I had to decide – feed it or trash it? I’ve seen a few bubbles on the surface, but I’d be hard-pressed to call it “bubbly”. However, while my starter is not all bubbly on the outside, I would say it is on the inside (sort of like me), so I am granting it a reprieve for now.

Sunday, August 01, 2004

rFAFi – Reader’s Funky Appliance Fiesta


Today is Reader’s Funky Appliance Fiesta hosted by umami. The idea is that you post a photo of an appliance or kitchen gadget that you own and that is unusual in design (i.e. funky).

Fortunately for me, the original concept of funky appliances was expanded to include other kitchen gadgets used in the preparation of food. I do have an old blender – but it is not nearly as colorful as umami’s. My other appliances are pretty standard. I do have a few unusual gadgets, though, one of which I’ve posted a photo of before. I’m still not sure what it is or how to use it.

For today, though, I decided to show you my lovely Pinocchio funnel given to me by my brother. He was purchased at shop near the Mercato Centrale in Florence, but he is made by Alessi, so I imagine he can be found in many other places.

I haven’t really put him to good use yet. I tried to use him recently when I was ladling jam into jars, but he got a stuffy nose.