Friday, November 12, 2004

Sugar High Friday – Try, try again…


Much as I love to make cookies, I’ve never had enough of a grasp of the science of baking to feel comfortable tinkering with a recipe. When it comes to cookies, I follow instructions. But for Sugar High Friday (SHF), as with Is My Blog Burning (IMBB), my goal is to create something that is my own (if for no other reason than so I can include the recipe in my post). Given that I failed to do so for the last SHF, the pressure was on for SHF2. The theme this time is Apples and the event is hosted again by it's founder, Jennifer of The Domestic Goddess.

As readers of my blog know, I’ve just started a long term cookie project. I’m planning (hoping) to make every cookie in Maida Heatter’s Book of Great Cookies, so of course it was one of her cookies that popped into my head when I was trying to come up with an idea. Her Cinnamon Almond Cookies are delicious – they have a cinnamon shortbread base covered with sliced almonds and topped with a lemon glaze. There’s a lot of cinnamon in the dough, enough to color the dough brown, but more importantly enough to give the cookies a distinctive cinnamon flavor. My idea was to take this base, add some pecans to the dough and then top the cookies with apple slices. The problems I anticipated were getting the apples and cookie base done at the same time, dealing with the moisture released by the apples, and making the apples stick to the cookies.

The last problem turned out to be relatively simple compared to the other two. I looked at apple tart recipes in my cookbooks and on-line and decided that apricot jam would be the perfect “glue” for this project. What I didn’t consider was that this would probably also contribute to the moisture problem. In my first attempt, I didn’t really address the moisture problem – I just hoped if I cooked the cookies a little longer and a little hotter there wouldn’t be a problem. I was wrong. Here’s the recipe from my first attempt…


Apple Tart Bars – Take One
(I don’t recommend you try this without making some adjustments)

2 sticks unsalted butter
1 cup sugar
2 tsp cinnamon
1 egg yolk
1 tsp vanilla
2 cups flour
1 cup finely chopped pecans
1/3 – ½ cup apricot jam
2 Granny Smith apples
1 tbs butter, melted
extra sugar to sprinkle on top

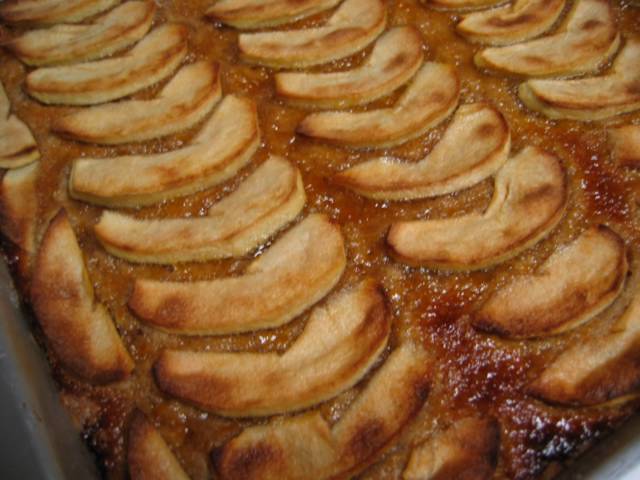
Preheat oven to 325 F. Butter a 10 ½ by 15 inch pan and line with parchment. Cream butter, add sugar and cinnamon and blend well. Add egg yolk and vanilla and blend. Gradually add flour at low speed and mix until incorporated. Add pecans. Press dough into pan and flatten (put wax paper on top and use a straight sided glass to smooth dough into an even layer). Warm the apricot jam in the microwave and stir to loosen it. Spread over the dough with a rubber spatula. Arrange thin slices of apple in a single layer over the dough. Brush melted butter over the apples and sprinkle with sugar. Bake for 40 minutes, raise temperature to 350 F and bake for 15 minutes more or until apples are nicely browned.

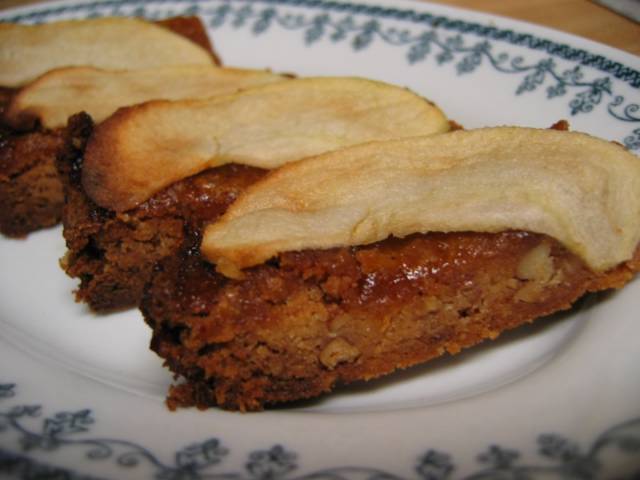
If you follow the instructions above, what you remove from the oven will look lovely and smell heavenly, but it won’t be a cookie. Actually, it tastes pretty good, but the texture is soft and wet. It might be good hot with some vanilla ice cream.

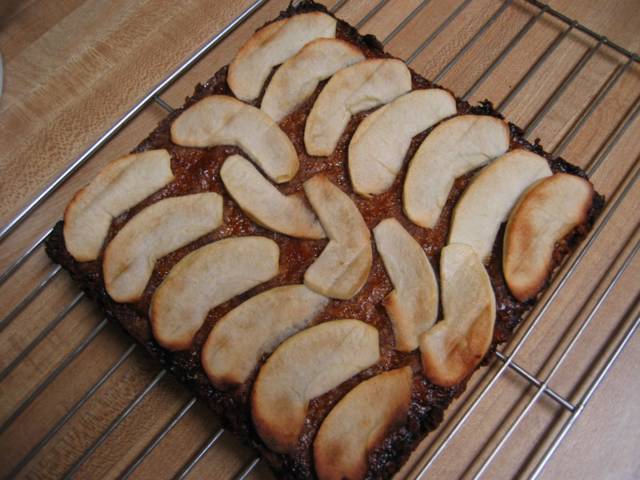
I decided to try again but this time I would bake the dough first, then add the jam and apples and bake some more. My concern with this method was that the cookie might overcook by the time the apples were well cooked. For my second attempt, I decided to cut the recipe in half.


Apple Tart Bars – Take Two
(this works, though it still needs some timing and/or temperature adjustments)

1 stick unsalted butter
½ cup sugar
1 tsp cinnamon
about ½ egg yolk (I probably used a little more)
½ tsp vanilla
1 cup flour
¼ cup apricot jam
1 Granny Smith apple
2 tsp butter, melted
extra sugar to sprinkle on top

Preheat oven to 350 F. Butter an 8 inch square pan and line with parchment. Follow instructions above to mix dough and spread in pan, but do not add jam or apples yet. Bake for 30 minutes. Remove and spread with warm apricot jam. Arrange apples over jam, brush with melted butter, and sprinkle with sugar. Bake until apples are browned, about 40 minutes. (With this temperature and timing the cookies were overdone – probably should start with 300 F, which is the temperature in the original recipe, and raise the temperature to 350 after the apples are added.)

I have one more idea about how to make this work. Bake the cookie without the jam and apples for 45 minutes at 300 F. Cool, cut into bars and store. Bake the apple slices separately until nicely browned. To serve, spread some apricot jam on the cookie and top with an apple slice. I haven’t tried this and I’m not sure it would be quite as satisfying as having the apple baked into the cookie, but it might be the only way to get the cookie and the apple done just right.

I came home this evening and considered making one last try, but opted instead for the perfect apple dessert… a Pink Lady apple all by itself. Oh so easy, but oh so good!


Monday, November 08, 2004

Mondays with Maida - Chocolate Chocolate-Chip Cookies


Page 19 in the old book / page 37 in the new book

The recipe for Chocolate Chocolate-Chip Cookies is one of 39 in the “Drop Cookies” section of the book. They are thin bumpy cookies that are very crisp and have a rich chocolate flavor. I compared the recipe in the old book to the one in the new book and there was one slight change. The new book calls for Dutch process cocoa but the old book only says cocoa. I happened to have Dutch process on hand so I used that. The other interesting difference is that in the old book, Maida Heatter frequently suggests lining cookie sheets with foil, but the new book now suggests using parchment paper. I remember that not too long ago parchment paper could only be found (at great expense) in cooking specialty stores, so I think this change reflects the times.

The dough went together quite easily and most ingredients were things I had on hand. The one ingredient that was a little unusual was light cream. The recipe calls for just two tablespoons. I can’t help but think that with all the butter in this recipe, skim milk could have been substituted without any noticeable difference. The other interesting ingredient is dark brown sugar. I don’t think I’ve used it with chocolate before, but it complements the chocolate beautifully.

These are simple drop cookies with no special handling. The dough is fairly stiff and spoons out easily. The one difficulty I had was with the baking. The recipe says that the cookies should be baked for 12 to 13 minutes and I found this to be too long. It wasn’t until the last sheet of cookies that I finally got the timing right – it turned out that 10 minutes worked best for me (and I think my oven runs a little cool). The longer the cookies were in the more they spread. The cookies that baked for 11 to 13 minutes became thin and lacey and the flavor verged on burnt. After 10 minutes the cookies were still very crisp after cooling, but held together better and had great chocolate flavor. The cookies shown in the picture above were baked for 10 minutes, the one below was longer.

If properly baked, these cookies are rich and delicious with a wonderfully crisp texture.

Next time – Santa Fe Chocolate Wafers.


baked too long

Nutrition Facts

Sunday, November 07, 2004

Mondays with Maida


I’ve written before about what a great book Maida Heatter’s Book of Great Cookies is – last week when I made her Chocolate and Peanut Butter Ripples and back in August when I made her Plain Old-Fashioned Sugar Cookies and Cobblestones. Please indulge me once more as I tell you a little more about what this book means to me.

The copy I have is from the eighth printing in October, 1982. I assume I purchased my copy either in 1982 or 1983. I don’t remember what other cookbooks I had then, but I’m pretty sure this was among the first. I was living in an apartment then and I don’t think my cookbook collection had yet swelled anything close to its present size. This book quickly became my favorite and cookies became “my thing”. My copy of the book is well worn and well loved. It falls open to page 193 (the best sugar cookie recipe) and other favorites with little coaxing. Over the next couple of years I gave copies to my mom, my sister, my great aunt, and my future sister-in-law. When my youngest brother got married, this book was no longer in print, so I had to give my sister-in-law-to-be a new Maida Heater cookie book.

A few months ago I discovered Jessica’s Biscuit and found that they have copies of Maida Heatter’s Book of Great Cookies. I snapped up five copies – one has gone to my youngest brother and sister-in-law, another to my brother Bob, and three are stashed away in a box under my bed. Two of these copies are for my nieces, Christina who is 6 years old and Cassidy who is not quite 5 months old, and the last is just in case. Actually, now I’m thinking I should have bought a few more!

I’ve got a number of favorites that I make from time to time, but haven’t tried many new recipes from the book in quite a while. After making the Chocolate and Peanut Butter Ripples last week I got thinking… I’d love to make all the cookies in this book (I counted and there are a little over 150). My plan is to start at the beginning of the book and work my way through it, making approximately one batch of cookies every week. I haven’t quite worked out what I’ll do with all the cookies, but I think it will be a lot of fun. I also really like the idea of documenting this project through my blog – I don’t know how long my blog will be around, but I’d like to think that Cassidy and Christina will be able to read it when they start making cookies from there own copies of the book.

By the way, the recipes in Maida Heatter’s Book of Great Cookies were reprinted in 1997, along with cookie recipes from two of her other books, in Maida Heatter’s Cookies. This book is still in print and is available from Amazon. I got the book out of the library and the recipes that I’ve compared are virtually identical, though it doesn’t have the charming illustrations found in the older book.

Please join me tomorrow and every Monday for cookies from Maida Heatter!

Sunday, October 31, 2004

Happy Halloween!


It seemed like such a great idea…pumpkin and black beans. I think I was pulling something out of the freezer when it came to me. There was a little leftover pumpkin in there and I thought, “I bet that would be good in chili.” I mulled it over some more and then it came to me – Halloween Chili! And of course for Halloween Chili (with orange pumpkin), black beans were the logical choice.

I started out with my recipe for Cincinnati Chili and went from there. Cincinnati Chili, if you haven’t had it, is spicy but a little sweet. My recipe calls for pumpkin pie spice, honey and a little chocolate in addition to the more traditional chili seasonings of chili powder and cumin. I thought the seasonings in that recipe would work well with the pumpkin, although I chose to omit the chocolate. I started out swapping the pumpkin for the tomato sauce and then kept tasting and adding more things until I got it the way I liked it. I found in the beginning that the pumpkin made it heavy and dull. I added some hot sauce and increased the vinegar in the hopes of brightening it up a bit. Then I threw in more chili powder and more hot sauce. I finally gave in – it needed the acidity of tomatoes – so I threw in a can of tomatoes. At some point I also upped the pumpkin to a whole can since I didn’t want yet another small bit of it floating around in my freezer.

In the end, I was happy with it – even if it wasn’t quite the Halloween Chili I originally envisioned.


Halloween Chili

1 tbs olive oil
1 onion, coarsely chopped
3 cloves garlic, finely chopped
1 lb lean ground beef
3 tbs chili powder
1 tsp cumin
1½ tsp pumpkin pie spice
2 tbs cider vinegar
1 tbs honey
½ tsp salt
1 tsp hot sauce
1 15 oz can pumpkin
1 14 ½ oz can diced or stewed tomatoes, undrained
1 29 oz can black beans, drained and rinsed
1 cup beef broth
1½ cup water

Heat the oil in a large dutch oven over medium high heat. Sauté the onions and garlic until the onions are golden. Add the ground beef. Break it up with the spoon and stir occasionally until it is browned all over. Add the remaining ingredients, bring to a simmer, lower heat and cook as long as you like. Happy Halloween!

Saturday, October 30, 2004

OK Art – This one’s for you…


Chocolate and Peanut Butter Ripples

I’ve been in the mood to bake lately, but until today just hadn’t found the right excuse. Yesterday I got an email from a friend saying there was nothing he could eat in “my little kitchen”. So, I looked through my favorite cookie cookbook in search of a recipe that would be to his liking. I love to bake cookies, but most of my cookie baking occurs around the holidays. When it comes to holiday baking, peanut butter is not one of the flavors I gravitate towards. Today my selection criteria were a little different, and peanut butter sounded perfect.

The recipe I settled on, from Maida Heatter’s Book of Great Cookies, was Chocolate and Peanut Butter Ripples. They are thin, crisp cookies with a layer of peanut butter dough nestled between two chocolate layers. The cookies in the drawing that accompanies the recipe appear to have concentric circles of contrasting doughs: the bottom chocolate layer is the largest and is topped with a smaller layer of peanut butter which in turn is topped with another, smaller layer of chocolate.

The chocolate and peanut butter doughs are very simple and mix up quickly. The recipe calls for smooth peanut butter, but the only peanut butter I had on hand was the kind they grind in the grocery store, so I used that. I added a pinch of salt since there was none in the peanut butter. I was concerned that the consistency might cause some problems, but it seemed to work just fine. The flavor was great and the texture of the peanut butter layer was almost like the peanut butter in a Reese’s cup.


peanut butter and chocolate cookie doughs

Assembling the cookies takes a little time, but is not difficult. You drop a small mound of chocolate dough, then top it with a small mound of the peanut butter dough, and cap that with another little mound of chocolate. The peanut butter dough was a little crumbly, so I shaped it with my fingers rather than dropping it from a teaspoon. The recipe suggests using a fork dipped in sugar to flatten the cookie, but I quickly abandoned that approach in favor of using a small plastic spatula. The chocolate dough was very soft and the fork, even though it was sugared, kept pulling off parts of the top layer that pushed up through the tines. You could also use a small glass – but a flat surface is definitely preferable to a fork. I would make one change next time – the recipe instructs you to divide the chocolate dough in half and use equal amounts in the bottom and top layers. I followed those directions this time and as you can see in the picture above, my cookies didn’t “ripple”. To achieve the concentric circles shown in the illustration, I think you would need to use more chocolate dough in the bottom layer and only a small amount in the top layer. It would also be interesting to see what would happen if you didn’t bother to flatten the cookies before baking them. I’ll bet they would spread just the same.


ready to flatten and bake

The cookies were delicious and despite the fact that the peanut butter appears to have all but disappeared from the outside, when you bite into one of the cookies there is a distinct layer of peanut butter. Maida Heatter never lets me down.

Tuesday, October 26, 2004

Keeping Warm


Many of the last few days have been cold and wet – a bone chilling combo. Sunday afternoon, as I huddled in a blanket in front of the TV, I decided it was the perfect kind of day to try a recipe for “hot spiced tea”. Recently I have been trying to clear out some back issues of various cooking magazines and this was one of the recipes that I saved from an old issue of Everyday Food (sorry – I neglected to make note of which issue it was from).

This “hot spiced tea” is a milky tea infused with fresh ginger, cinnamon, cloves and black pepper and sweetened with honey. Unfortunately, in order to make the tea I had to go out into the cold and buy some 2% milk and fresh ginger. But once back home, I quickly mixed up a pot of the stuff and indulged in a cup. Mmmmmm – spicy, sweet and warm – like liquid gingerbread. Then it occurred to me – this must be like that chai tea I keep hearing about. Am I the only one in the world that didn’t know about it?

I put the leftovers in the refrigerator and found that the tea reheated beautifully in the microwave. What a wonderful thing to come home to on a soggy Monday night!

Sunday, October 24, 2004

IMBB 9 - Terrine for One


Today is the 9th edition of Is My Blog Burning. This time the host, Derrick of An Obsession with Food, has challenged us to create a terrine for the occasion. I decided early on that didn’t want to make a meat terrine or one with aspic, but I agonized over what I would make for the next couple of weeks. First I was leaning towards using polenta, then rice, and then I finally settled on potatoes.

According to Derrick’s terrine tutorial, a terrine is layered and is formed in a mold. I’m afraid the layering in my terrine is minimal. I layered roasted green peppers with a potato mixture in small Pyrex refrigerator dishes. I had originally thought I would use larger pieces of pepper, but then realized that might prevent the layers from sticking together. I ended up with six little strips of pepper in each terrine – which looks almost comical in cross-section.


The potato mixture is evidence of my current infatuation with roasted garlic. I used four small potatoes, one small onion, and a whole head of roasted garlic. After assembling the terrines, I chilled them briefly in the refrigerator and then unmolded them before baking. This method resulted in a nice, crusty exterior and ensured that the terrines came cleanly out of the molds. It’s possible that they could have been easily removed from the molds after baking, but I didn’t want to risk it!


This IMBB afforded me an opportunity to make use of my itty bitty canapé cutters. I cut shapes out of both red and green roasted pepper and placed them in the bottoms of the molds. It was a little tricky because the pepper pieces tend to move around when you press in the potato mixture – but it was fun!


My little terrines were quite tasty and I think they would be a wonderful for brunch or dinner. Best of all, they can be assembled ahead of time and held in the refrigerator until it is time to put them in the oven.


Individual Potato and Garlic Terrines with Roasted Pepper

Makes 2 terrines

4 small potatoes
1 small onion
1 head of roasted garlic
roasted pepper (12 strips plus cut-outs for garnish)
olive oil
salt
pepper

Peel the potatoes, place in a pot and cover with water. Bring to a boil and simmer until tender. Drain and put in a medium bowl. Finely dice onion. Heat a small amount of olive oil in a frying pan over medium low heat. Sauté the onion until it starts to brown. Coarsely mash the potatoes, add the garlic (peel or squeeze from skins), sautéed onions, a little olive oil, and salt and pepper to taste. Stir together, using the spoon to break up and distribute the garlic.

Oil the molds (350 ml Pyrex refrigerator dishes) and arrange pepper cut-outs in the bottom. Carefully place the first layer of the potato mixture over the pepper pieces. Push 3 strips of pepper into first layer, cover with more potato, and then repeat. You should have three layers of potato with two layers of pepper strips. Place the molds in the refrigerator for about an hour.

Preheat the oven to 350 F. When ready to bake the terrines, run a knife along the straight edges of the mold and invert the mold over your hand. Shake gently to unmold and then place in baking dish. Brush all over with olive oil. Bake until golden – about an hour. Allow to cool slightly before serving.

Friday, October 22, 2004

IMBB Finds a Home

Is My Blog Burning (IMBB) has become such an integral part of the food blogging community that it's hard to believe it's not even a year old. Ron of loveSicily decided that it was time for a web site devoted to IMBB happenings and other food blogging events, so with IMBB founder Alberto's blessing, he set up www.ismyblogburning.com. It came on-line just a couple of weeks ago and Ron has been working hard to add features and make the site truly a virtual gathering place for food bloggers. So stop by and take a peek at the IMBB site and don't forget - IMBB 9 is this Sunday!

Tuesday, October 19, 2004

Who could resist...


…a sign like this? Not me. I bought four heads, left one with Bob, and kept three for myself. This weekend I roasted two of them and made potato garlic soup. This is the first time I have roasted garlic where I have been happy with the results.


I followed Deborah Madison’s instructions in Vegetarian Cooking for Everyone. Her method is a little different in that you don’t cut the top of the garlic off. You peel off most of the outer papery skin, drizzle a little olive oil over the garlic, add some water to the dish, and cover it tightly with foil. Bake covered for 45 minutes at 350 F, then remove the foil and bake for another 30 minutes.


The garlic smelled really good as it was cooking, but the soup was amazing – better than potpourri any day!! The soup was made simply of onions, potatoes, the unpeeled roasted cloves of garlic, olive oil, bay leaves, salt, and water. It’s passed through a food mill, finished with a little cream and garnished with chives. What I found really surprising was that it tasted like a soup made with a rich stock and yet it used only water. It was delicious.


Monday, October 18, 2004

Union Square Greenmarket

I've mentioned before how much I love the Union Square Greenmarket, but let me show you why...


...any questions?

Sunday, October 17, 2004

A “Relaxed” Dinner in New York


In the end it all came together – it was fun, it was beautiful, and most of all it was delicious. But relaxed? No. Bob, Chuck and I made most of the dishes featured in the October/November Fine Cooking article, “A Seattle Chef’s Relaxed Menu” last Sunday while my parents and I were visiting with Bob and Chuck in New York. Because of other plans we had for the weekend we weren’t able to do some of the advance preparations suggested in the article, so Sunday evening got a little crazy. My parents are used to eating around 5:00, but our dinner was on the table at a fashionably late 8:30.

We started with the “Homemade Bianco with Icy Grapes” which is Sauvignon Blanc wine infused with rosemary, mint and lemon zest and served over frozen red globe grapes. This was the recipe that had originally caught my eye in the article. My mom usually drinks her wine with ice because she likes it very cold. I thought this was such a clever and attractive presentation – the frozen grapes keep the wine chilled (at least for a little while) without diluting it. We didn’t make the perperonota, but Bob served several different cheeses with the wine including an aged Gouda that was really wonderful.

The “Mustard-Crusted Roast Chicken” was simple, delicious, and completely stressed us out. First there was the matter of finding space in Bob and Chuck’s NYC-sized refrigerator for two chickens to sit uncovered and coated in mustard paste for several hours. Then we had to figure out how to fit them both in the oven at the same time. Finally, there was the problem of deciding when the chickens were done. We used a thermometer to measure doneness, but had little confidence that we were doing it correctly. Somehow when we finally decided they were done (the second time), they were perfectly cooked.


As sides, we had Bob’s unbelievably rich mashed potatoes and the “Warm Green Bean, Pancetta & Tomato Salad with Parmesan”. Part of the salad prep had been done earlier, but cooking the beans and preparing the hot dressing were to be done at the last minute. Earlier that day Chuck had been visiting my blog and saw the comment that Michael left. He warned that the dressing explodes when the vinegar mixture is added to the warmed fat and oil. We were glad to have the heads-up. Chuck very carefully prepared the dressing and fortunately there were no explosions.

Everyone was very hungry by the time dinner was finally served, but it was worth the wait. The table was beautifully set and the food was delicious. We finished up with the “Cornmeal Rosemary Cake with Pine Nuts & Orange Glaze”. I love corn meal, and had been looking forward to trying this recipe. It has an unusual touch – blanched rosemary leaves are mixed into the orange glaze. The cake was as lovely to look at as it was to eat.


Wednesday, October 06, 2004

NYC Weekend


I have a long weekend in NYC coming up which I'm really looking forward to. It's a special occasion of sorts since my parents are also going, so my brother has a fabulous weekend planned. We'll be seeing a play, eating out, and Sunday night we'll be cooking "A Seattle Chef's Relaxed Menu" from the October/November issue of Fine Cooking. Best of all, we get to visit with Bob and Chuck.

Have a wonderful weekend - I'll see you back here next week!

Monday, October 04, 2004

Just My Size


Last week the "personal watermelons" were on sale at my grocery store, so I decided to see what all the fuss was about. The personal watermelon is a seedless watermelon that is about the size of a cantaloupe. I live alone, so the size is perfect for me. I also like that they don't require a major commitment of refrigerator space. In terms of taste, I couldn't detect any difference - it tasted like watermelon to me. The seeds are quite small (they're called seedless, but there are many small soft white seeds) so you can eat them, I think, without fear of watermelons growing out of your ears.

They're very attractive too. In fact, I think cut in half and scooped out, they would make fantastic bowls for serving fruit salad.

Saturday, October 02, 2004

IMBB 9 is Coming!

Derrick at An Obsession with Food will be hosting IMBB 9: Layers and layers, with the theme of terrines. If like me you have no experience with terrines, check out Derrick's post which includes a "terrine primer" with lots of ideas and helpful information. The date is October 24th.

Friday, October 01, 2004

Sugar High Friday #1 - Chocolate Bread Pudding with White Chocolate Sherbet


Jennifer at Domestic Goddess has proposed yet another communal cooking and blogging event – Sugar High Fridays: the International Sweet-Tooth Blogging Extravaganza or SHF:ISTBE for short (actually, either one is a mouthful!) Mmm…sweets…sign me up!

The theme for this first Sugar High Friday is white chocolate. I have nibbled on white chocolate on occasion, but I don’t think I’ve ever cooked with it before. I couldn’t get my imagination in gear for this event, so I searched the Food Network website and found a recipe from Gale Gand for Chocolate Bread Pudding with White Chocolate Sherbet. At first I planned to make only the sherbet, but that wouldn’t have been terribly photogenic, so I racked my brain trying to think of something that would complement the sherbet both in terms of flavor and visually. Nothing seemed quite right. Finally, I acknowledged to myself that what I wanted was REAL chocolate. To be specific, I wanted that chocolate bread pudding that was included in the recipe.

I made a deal with myself – I would make the bread pudding, but I would have to cut the recipe down to a single serving. For most of the ingredients I simply divided the amount called for by 6. For the bread I used 1 ½ slices of Pepperidge Farm white bread – though if I were to do this again I would increase that to 2 slices. I happened to have some leftover heavy cream, which I used, but I substituted skim milk for the half-and-half. I think another time I would use all milk.

For the sherbet I used El Rey Icoa White Chocolate, which is touted as being “Venezuelan single bean origin”. The sherbet couldn’t have been easier – however the melted chocolate seemed to float to the top of the mixture as it chilled in the refrigerator. When I was ready to freeze it, there was a soft skin on top. Fortunately, it dissolved back into the mixture when I stirred it, and when I strained the mixture there were no lumps.

I ate the bread pudding just slightly warm with a scoop of the white chocolate sherbet. It was heaven, but oh so rich. I should have split the bread pudding into two servings, and next time I would, but I couldn’t stop myself. Just in case you haven’t looked at the recipe yet, not only does it have chocolate, cream, and eggs in it, it also has vanilla bean (which I recently realized is just as addictive as chocolate) and dried cherries. Topping it with white chocolate sherbet was overkill, but I’m not complaining. The sherbet was wonderful – the first bite was just like biting into a white chocolate bar, only cold, and wet, and with more of that lovely vanilla bean.

I went to bed with a heavy stomach but a happy heart. When’s the next Sugar High Friday?


Monday, September 27, 2004

Halfway to Liking Shrimp


Shrimp Fra Diavolo

I do believe I’ve reached a milestone of sorts. If, as Jeffrey Steingarten claims, you can rid yourself of a food phobia by eating it eight to ten times at moderate intervals, then I am halfway to liking shrimp.

I made Shrimp Fra Diavolo with Spaghetti from Italian Classics this weekend. This time I used frozen peeled and deveined shrimp from Whole Foods. That is definitely the way to go – they smelled so much better than the “fresh” shrimp I bought from another store last month. Actually, they didn’t smell at all – which is as it should be. It was also nice not to have to peel and devein them. I thawed the bag overnight in the refrigerator, pulled their little tails off, rinsed them, dried them, and they were ready to go.

After my last experience with shrimp, I felt that I needed something bolder and spicier to mask the flavor of the shrimp, so I picked a recipe with copious amounts of garlic and hot pepper flakes, not to mention wine and cognac. However, the fact that the shrimp were in better condition this time was probably a bigger factor than all that garlic and hot pepper in making the shrimp more palatable.

When I first selected the recipe, I failed to notice that it called for flambéing the shrimp. I have never flambéed anything before and was a little reluctant to attempt it. I’ve always thought of the process as being mostly for show and not worth trying at home (though fun to see in a restaurant), but the recipe had a note which made me rethink my position: “Flambéing the shrimp in cognac brings out its sweetness and provides a nice balance to the spicy, garlicky tomato sauce.”

The shrimp are cooked quickly in a frying pan over high heat, doused with cognac, and then flambéed. That’s the plan anyway. My fear before starting was that I would have an out-of-control open flame that would burn me and/or my kitchen. What actually happened was that I couldn’t get the damn thing lit. I suspect that my pan, which was cast iron, was so hot that the alcohol cooked off before I even attempted to light it. The recipe had said to add the cognac and then wait a few seconds for it to “warm”, but I think the cognac was hot the moment it hit the pan – it steamed up like crazy. If anyone has had experience flambéing or knows how flambéing affects flavor, I’d be very interested to hear about it.

With all the excitement in the kitchen, I completely forgot to take pictures until after I had eaten dinner. So the picture above is of the leftover shrimp and sauce still in the pan and without the spaghetti.

Given that I am not yet a full-fledged shrimp fan, I enjoyed this dish quite a bit. I had some leftovers tonight for dinner and was happy to find that reheating shrimp in the microwave seems to work just fine.

Five more shrimp meals to go. Any suggestions?

Saturday, September 25, 2004

More of New Orleans

My sightseeing in New Orleans was limited to just a few hours the day I arrived and I spent all of that time exploring the French Quarter. It is a relatively small area that you can easily cover on foot. I’m certain that there is much I didn’t see even within that small area. I carried my guidebook with me, but was reluctant to keep my nose buried in it, so I know I walked by many a historic site completely oblivious to its proximity. I did make two food-related stops highlighted in my guidebook: Central Grocery, home of what many consider to be the best muffuletta in New Orleans, and the French Market.


Central Grocery

Central Grocery is a small Italian grocery with an old-time feel. It has wooden shelves laden with all sorts of Italian pantry items and a well stocked deli. It is know for its muffuletta sandwich – a monster of a sandwich loaded with deli meats and cheeses and olive salad. It is the olive salad that makes the sandwich (so they say – I didn’t have one), and you can buy it in a jar to take home. I had hoped to bring some olive salad home as a gift, but it is only offered in one size – huge – and it weighed too much to carry home easily.


Central Grocery shelves


French Market

My other stop was the French Market which includes a small farmers market and a much bigger flea market. The farmers market has some fresh produce, but also has many packaged items including various spice mixtures typical of the region. The flea market is more of an endless souvenir stand. You’ll find row on row of T-shirts, beads, etc. It was unbearably hot, so with a sea of T-shirts still before me, I decided I had seen enough.


French Market - farmers market

I think the best part about walking around the French Quarter is just looking at the houses. The architecture in New Orleans is unlike anything I have seen before, with its distinctive cast-iron balconies and fences.


cast iron

Of course, the other great thing about New Orleans is its food. Because I was with a group, it turned out I had few opportunities to choose a restaurant myself. I mostly went along with the group. One place we went to as a group that was very nice was the Palace Café just across Canal Street from our hotel. I had a pork dish that was very good, though I don’t remember much about it now. I do remember dessert – more for the spectacle than how it tasted. I shared an order of Bananas Foster with someone, which was prepared tableside. I managed to capture it in a picture…


Palace Café - Bananas Foster

The last night I begged off from group activities, since I was going to have to get up extremely early the next morning. That was only part of my motivation, though, I wanted to pick a restaurant myself! I looked through my guidebook for a nearby restaurant that sounded good and finally settled on Herbsaint which was just around the corner on St. Charles. I got there before they opened for dinner, so I went to the bar to order a drink and kill a little time. I had planned to order a glass of wine, but I noticed they had a Herbsaint cocktail. I asked the bartender about it and he said it was like a black jelly bean. I tried to order it – but he seemed intent on talking me out of it! I don’t know if he had decided that I wouldn’t like it or if he just didn’t like it. I ended up with a glass of wine. I sat at a table by the window and watched the world and the St. Charles streetcar go by.

My meal was very good and my appetizer and dessert were both outstanding. I ordered the Herbsaint, tomato and shrimp bisque as an appetizer. I didn’t realize at the time that it was flavored with Herbsaint liqueur. Actually, at the time I didn’t even know that the restaurant was named for the anise flavored liqueur that is made in New Orleans.

My entrée was Muscovy Duck Leg Confit with Dirty Rice and Citrus Gastrique. It was very good, but the duck confit seemed a little dry. As I was eating the dirty rice, I came on a bit of something I couldn’t really identify and then I recalled that dirty rice has chicken liver in it. I was thoroughly enjoying the rice, though, and even that realization didn’t dissuade me from cleaning my plate. Maybe there is hope for me!

It was a wonderful meal, but I couldn't leave without having dessert. The waiter (aka the bartender) encouraged me to try the Banana Brown Butter Tart with Fleur de Sel Caramel, so I took his advice. It was amazing. Each bite had all these different flavors swirling around – sweet, salty, tangy… soooo good.

I walked back to my hotel in a wonderful mood and so very happy that I had had dinner at Herbsaint.

Monday, September 20, 2004

Oops!

After a leisurely dinner and staying up too late watching the Emmys, I got on the computer to do a couple things before going to bed. I happened to take a look at Zarah Maria’s blog and was surprised to see her IMBB 8 entry – isn’t that next weekend? Uh… no.

Actually, dinner last night was to have been my entry for the 8th edition of IMBB – I thought I was ahead of the game, cooking last night and planning to write it up this week. Unfortunately IMBB was yesterday, so I’m late – but here goes anyway…


This is a simple dish that to me is comfort food in every way. It’s a whole meal in a pot, it tastes great, and it is reminiscent of pot roast, which was my favorite dinner growing up. I created it many years ago when I acquired my first and only piece of Le Creuset. I threw together some ingredients in my new pot and christened the dish “Blue Pot Chicken”. I don’t think it’s ever come out quite the same or quite as good as that first time. In that happy accident the amounts of chicken, potatoes, onions and white wine must have been just so and the stars must have been perfectly aligned, for when I pulled the pot out of the oven the potatoes were perfectly roasted with crusty brown bits here and there and best of all, the onions, potatoes, chicken and wine had combined to form an amazing syrupy sauce.

The problem is I don’t know how much wine (or anything else for that matter) I used that first time. Also, I am sure that every time since then I’ve gotten greedy and added too much wine, thinking that more wine equals more sauce. When you’ve got too much liquid though, you don’t get a sauce and the vegetables don’t roast, they stew.

I’ve partially solved the problem and if I can show a little more self restraint next time, I think I know how to solve it completely. I think the trick is to reduce the wine considerably before putting the pot in the oven – this isn’t how I used to do it, but I think it will work. Last night I did that, but after mixing in the vegetables I was afraid there wouldn’t be enough sauce and threw in more wine – will I ever learn? I ended up with way too much liquid - maybe some of it came from the vegetables – so after cooking, I removed the chicken and vegetables and then reduced the liquid until I had that wonderful sauce. My vegetables weren’t exactly roasted, but it was delicious none the less.


Blue Pot Chicken

2 or 3 pieces of chicken on the bone
1 small onion cut as you like – I cut it vertically into ¼ inch slivers this time
2 medium potatoes cut into 1 inch chunks
3 medium carrots cut into ½ to ¾ inch slices
½ to ¾ cup white wine (I used Pinot Grigio this time)
1 tablespoon olive oil
salt and pepper

Heat the oil in a 2 quart pot that can be used both on the stove and in the oven over medium high heat. Salt and pepper the chicken on both sides and then brown the chicken pieces for a couple of minutes on each side (note: because this is a small pot, you may have to do this one piece at a time). Set the chicken aside on a plate. If after browning the chicken there seems to be excess oil in the pot, pour it off into a small bowl and then put about 2 teaspoons of oil back in the pot and throw in the onions, add some salt and pepper and cook the onions until they start to brown. Deglaze the pan with the wine and reduce the wine by at least half. Spoon a little of the wine and onion mixture on top of the chicken and then add the carrots and potatoes to the pot and stir to combine with the onions and wine. Arrange the chicken on top of the vegetables (it will probably just fit), cover the pot and put it in a 375 F oven for about an hour. If when you remove it from the oven you find there is too much liquid, remove the chicken and vegetables and then reduce the liquid over medium heat until the desired consistency is reached. Spoon the sauce over the chicken and vegetables and serve.


Thursday, September 16, 2004

Back from New Orleans

Actually, I’ve been back for almost a week. It’s been very busy at work, though, and I’ve been playing catch-up at home too, so I haven’t found time to post until now. I really enjoyed the trip to New Orleans and I’m really relieved to hear that it came through hurricane Ivan without the disastrous flooding that was feared. It’s hard to imagine the place I was visiting just days ago boarded up and deserted.

The weather while we were there was perfect. It was hot and humid, especially the day we arrived, but there was no sign of rain. I met up with a coworker at the airport and after checking into our hotel, we grabbed a quick lunch at a small restaurant (its name escapes me now). I had red beans and rice with sausage and a side salad. It tasted pretty good after I doused it with hot sauce. After lunch my coworker headed off for a walking tour of the Garden District and I set off to explore the French Quarter.


My first stop was Café Du Monde, the place to get beignets and café au lait. It is an open air café near the French Market that opened in 1862 and serves little more than coffee (in several variations) and beignets. The prices are very reasonable: $1.37 for a plate of three beignets and $1.37 for café au lait. Because of the heat, I opted for an iced coffee with my beignets. My order arrived quickly. The beignets were hot and buried under a mountain of powdered sugar. There is no way to eat these things daintily and there is little chance that you will escape without the tell-tale signs of powdered sugar on your clothes. Beignets are basically donuts with powdered sugar and will probably put you well over your daily allowance of fat grams, but eating beignets at Café Du Monde is a quintessential New Orleans experience.


Monday, September 06, 2004

I'm off...


I'm leaving for New Orleans early tomorrow for work, so I won't be posting for the next week. I will only have a few hours to sightsee, but I'm a three-meals-a-day-kinda-gal, so there will be lots of eating to be done! I probably won't be able to post before Sunday, but please do check back then!

Sunday, September 05, 2004

Soup for Supper


I’ve been really busy this week, so I’ve been eating leftovers and prepared food from the grocery store. Last night I finally had a chance to cook but wasn’t up for something terribly complicated. I flipped through a cookbook that just happened to be out by my computer and came upon a recipe for black bean soup that sounded good. I decided on a supper of soup, salad and muffins.

The recipe for black bean soup is from Moosewood Restaurant Cooks at Home: Fast and Easy Recipes for Any Day. I’ve had the book for a while, but have not cooked much from it. I happened to have the book out because I had recently emailed an icing recipe from it to a friend. The icing goes with the “Six Minute Chocolate Cake” which, as you might deduce from the name, is very easy and also very good. I made the cake over a year ago and I don’t think I had used the book since then. As I was getting the link at Amazon just now, I noticed that the book has a five-star rating with 33 reviewers – guess I need to refer to this book a little more often!

Black bean soup is something I’ve always thought I should like – after all, I love black beans – but, I’ve never had one that I really enjoyed. I have tried making it myself a couple of times and had it once in a local coffee shop, but each time found it to be somewhere between boring and unpleasant. This recipe caught my eye because it had almost equal amounts of black beans and tomatoes. It also uses a technique that I really like: about half the soup is pureed and stirred back into the pot creating a thick, hearty soup that is still chunky. There is a fair amount of chopping to do, but the soup goes together quickly and easily.

I had just about all the ingredients on hand. There was one ingredient though that I had never cooked with: sun dried tomatoes (the dry ones, not the ones in oil). I wondered as I prepared the soup, what these would add to the soup in the way of flavor. Even after having eaten the soup, I’m still not certain. The soup was delicious and there was something about the flavor that was more than I expected. There was almost a slight sweetness, which may have come from the sun dried tomatoes, but could also have come from the canned tomatoes. I’m tempted to prepare it again without the sun dried tomatoes and taste the two side by side.

Before the soup I had a simple green salad and alongside the soup I had my very own Pumpkin Corn Meal Muffins. I stuck a DVD in the DVD player, got comfy on the sofa and enjoyed my home cooked meal.

Wednesday, September 01, 2004

WWWBW - New World Merlot


the winner - Reynolds Vineyard 2001 Merlot

Today is World Wide Wine Blogging Wednesday – at least for the next 37 minutes. This is Lenn of LennDevours idea – another communal blogging event modeled after Alberto’s IMBB. The theme for this first WWWBW is new world Merlots (excluding those from the US). I wasn’t going to bother to post, because I have been so busy and was having trouble mustering up some enthusiasm to write this up, but I started reading some of the others and now I’m really curious if someone else tried the same ones I did and what they thought…

I bought two Merlots to try. I didn’t like the first one I tried at all, so I decided to get another and compare them. I know nothing about wine and in fact have fairly limited experience drinking it. I rarely drink any wine and up until a couple of years ago I had hardly ever had red wine. That changed when I went to Tuscany last October. We opened one, two and sometimes three different bottles of red wine each evening with dinner. I didn’t relish them all, but many I did, and I finally came to appreciate red wine.

I am still very much a wine novice, though, and am totally flummoxed by the vocabulary used to describe the experience of it. In fact, I can’t quite understand how people smell and taste the things they claim to smell and taste in wine – cedar, leather, tar!?

I approached this originally with quite a bit of enthusiasm. I invited friends over for dinner and explained that I would be serving Merlot (which they would have to taste) and later writing about it for WWWBW. Unfortunately, a family emergency called my friends out of town and I was left on my own for the tasting. I found a site that had a so called wine tasting course. I decided to sit down at the computer with my wine as I read through the course and take notes with the hopes that the course would enlighten me and allow me to talk the talk. No such luck – the course was about as disappointing as my first Merlot.

The first Merlot that I tried was a Montes Merlot Special Cuvée 2003 from the Colchagua Valley in Chile. I found this review: “87 PTS WILFRED WONG. Smooth and textured, the pleasing '03 Montes Special Cuvee Merlot is a dandy of a wine; ripe and easy with a hint of wood; excellent with charred broiled pork chops.” The label described it as “An elegant and refined wine with a marked fruitiness almost irresistible to Merlot lovers. Strong, spicy black pepper full of harmony and soft on the palate. Aging in American oak gives structure and finesse that will also permit short term cellaring.”

The wine was deeply colored and almost opaque. I sniffed it and groped for words to describe its aroma. All I could come up with was “smells like red wine”. To me the wine was sharply flavored and unpleasant. When I later sipped it alongside the second Merlot, I could tell there was a big difference but struggled to describe it. The other was obviously fruity in comparison, but what was this one? The word I came up with – perhaps totally inappropriate, and according to my spell checker, not even a word – was “resiny”. Maybe in wine-speak this would be pine.

The second bottle I tried was a Reynolds Vineyards 2001 Merlot from New South Wales, Australia. The bottle says “This velvety Merlot offers enticing cherry, vanilla, and toasted herb aromas with plush cherry and plum flavours.” This wine was a much more attractive color and had a definite fruity (but still dry) taste. While the other Merlot left my tongue tingling, this one left my throat feeling warm – which I much prefer! While I would probably still gravitate to an Italian wine over a Merlot, I think I will enjoy the rest of this second bottle.

Must run – I’ve got to catch my forty winks before another long day tomorrow!


the also-ran - Montes Merlot Special Cuvée 2003