Monday, November 29, 2004

Mondays with Maida - Big Old-Fashioned Chocolate Cookies


Page 22 in the old book / page 40 in the new book

First, a couple of administrative details… I’ve decided to add the nutrient facts to each post. I’m not sure this will be welcomed, so I’ve set it up so that you don’t have to look at it. There’s a link at the end of the post that will take you to another page where you can find out the number of calories, grams of fat, etc. I’ve calculated these using Living Cookbook (which, by the way, is a great program if you’re in the market for cookbook software). The program actually calculates the amounts of many other nutrients, so if there's something missing that you'd like me to include, let me know. I’ve also created an archive of all the Mondays with Maida posts and have put links to both the archive and the nutrient facts on the sidebar.

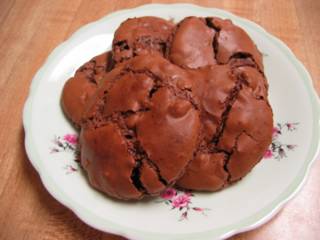
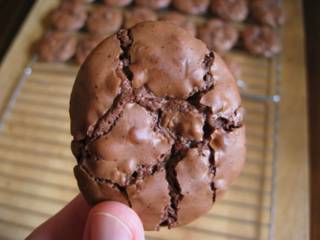
Now on to the important stuff! The next recipe in the “Drop Cookies” section of the book is for Big Old-Fashioned Chocolate Cookies. These are big, cakey cookies that are covered with a rich chocolate glaze. There is nary a hint of crunch in them, not even at the edges. They’re the sort of cookie I imagine would go over big with kids. They’re big, beautiful cookies and it took all my willpower to refrain from eating one until after dinner.


This is another easy cookie that doesn’t even require a mixer. The dough is mixed in a saucepan, and since the recipe makes only 18 cookies (I actually ended up with a few more), forming and baking the cookies is quick work. I had no trouble with these and found that the actual baking time fell within the recommended range. Unsweetened chocolate is used in both the cookie and the glaze.


These cookies are good, though I prefer something with a little more textural interest. I have to say, though, that the glaze makes them quite enticing. There’s a good amount of dark brown sugar in them, but I didn’t notice it as I did in the Chocolate Chocolate-Chip Cookies. That may be because I was distracted by the glaze and the cakey texture and wasn’t paying attention to such subtleties. I wish I could have another so that I could more accurately report on these things, but if you check out the nutrition facts you’ll see why I can’t.

Next time – Key West Chocolate Treasures.

Nutrition Facts

Wednesday, November 24, 2004

Happy Thanksgiving!


Tomorrow is Thanksgiving here in the States and I am thankful for many things, most of all my family and friends. This year I am also thankful for the friendship and sense of community that I have found among my fellow food bloggers. Checking my email for your thoughtful and supportive comments and visiting your blogs has become a part of my daily ritual and a source of great pleasure. So thank you all!

My family is going out to dinner tomorrow. It’s not something we normally do, though we have on occasion. Normally I’d rather eat our traditional meal of turkey, stuffing (either bread or pork and potato), butternut squash, mashed potatoes, baked sweet potatoes, cranberry sauce, rutabaga, celery sticks, pickles, pumpkin pie and mince meat pie at one of our homes. This year I’m welcoming the chance to relax a little bit and enjoy a meal at a restaurant that as kids we thought was THE place to go. They’ve got the best popovers! Actually, we’ll be celebrating my sister-in-law’s birthday at my house tomorrow evening, so I’m still having to prepare a little for tomorrow. I’m keeping it simple since we’ll have eaten our big meal earlier in the day – I’m going to serve chicken soup and pecan pie (with candles in it!).

Here’s my mom’s recipe for pecan pie. Like the restaurant we’re going to tomorrow, this pie is something we thought was pretty special as kids – my mom didn’t make it very often, so when she did it was a real treat. It’s not nearly as sweet as other pecan pies I’ve had, but I’ve always preferred it to those others. Happy Thanksgiving everyone!

Pecan Pie

¼ cup butter
½ cup sugar
1 cup dark brown corn syrup
3 eggs, slightly beaten
1 tsp vanilla
¼ tsp salt
1 cup pecans, broken

Cream butter. Add sugar and cream well together. Add corn syrup, eggs, vanilla, salt, and pecans. Pour into pastry-lined pie plate. Bake at 425 F for 10 minutes, then reduce heat to 350 F and bake for an additional 40 minutes. (You should probably shield the edge of the pastry with foil partway through cooking – I neglected to do that this time and you can see that the crust is quite dark.) Makes one eight-inch pie.

Monday, November 22, 2004

Monday with Maida - "Chocolate Street" Cookies


Page 21 in the old book / page 39 in the new book

Next up in the “Drop Cookies” section of the book is “Chocolate Street” Cookies. The quote marks are Maida Heatter’s, not mine. I find them rather curious (the quote marks, not the cookies), since this is the only cookie in the book that has them and they are not explained in any way. These cookies, which a note in the book says are sometimes called Brownie Drops, are smallish cookies, not too thick, and are crunchy in a fragile, crumbly way (as compared to the firm, candy-like crunch of the last two cookies) with a chewy center. The recipe in the old book calls for German’s sweet chocolate, but suggests a variation where the sweet chocolate is replaced with semi-sweet chocolate and the granulated sugar is replaced with dark brown sugar. The new book calls for semi-sweet chocolate and granulated sugar and does not mention any variations. I decided to go with the original recipe, tempted though I was to use the dark brown sugar.


The dough mixes up quite easily. The chocolate and a small amount of butter are melted in a double boiler and then combined with the other ingredients in a mixer. The ingredients are reminiscent of a brownie recipe – lots of chocolate, sugar and eggs and very little flour. There is also a little cinnamon in these, but I could not detect it in the finished cookie. With the exception of the German chocolate and possibly the walnuts, the ingredients are ones that I would generally have on hand.


These cookies are very good, but I think they might be better if they were a bit larger. I’d prefer more of a chewy center, though I might also have achieved this by reducing the baking time slightly. I think another time I would definitely give the semi-sweet chocolate and dark brown sugar variation a try.

Next time – Big Old-Fashioned Chocolate Cookies.

Nutrition Facts

Sunday, November 21, 2004

IMBB10 – Holiday Biscotti


This tenth go-round of the now famous Is My Blog Burning is hosted by Jennifer, aka The Domestic Goddess, and has as its theme “Cookie Swap”. Because of time constraints, I did not attempt to come up with a creation of my own, but instead turned to Epicurious for inspiration. When I came upon the Holiday Biscotti with Cranberries and Pistachios, I knew I’d found my cookie. They looked festive with red cranberries and green pistachios, sounded easy, and featured an ingredient that was new to me – pistachios.


I found shelled pistachios at Trader Joe’s, which made assembling the dough for these cookies extremely easy. The recipe indicates that the finished dough is sticky, but I found it was not difficult to handle. Forming the logs took just a minute or two and wasn’t messy at all. While baking, they smelled amazing – mostly from the butter and lemon, I think. There were a number of comments on the recipe at Epicurious that said a longer baking time was needed, so I upped the time to 33 minutes. After cooling I used a bread knife to slice the logs. There was some crumbling, but it wasn’t bad.


After a second bake and cooling, the cookies are finished with a dunk in some melted white chocolate and then briefly cooled in the refrigerator. I nibbled on the ends as I sliced the logs and ate one finished cookie. The cookies are delicious – the anise and lemon combination is wonderful and the white chocolate is the perfect final touch. I didn’t pick out a noticeable pistachio flavor, though. Maybe I need to eat another one…


Monday, November 15, 2004

Mondays with Maida – Santa Fe Chocolate Wafers


Page 20 in the old book / page 38 in the new book

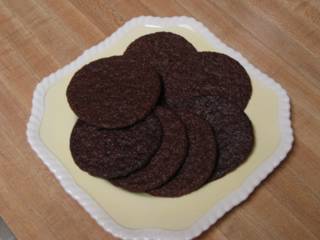
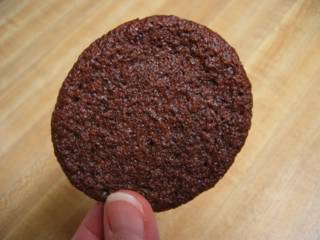
Continuing on in the “Drop Cookies” section of the book, this week brings me to Santa Fe Chocolate Wafers. I should forewarn you that the book starts with about a dozen different chocolate drop cookies, so we’re going to be doing chocolate for the next couple of months! The Santa Fe Chocolate wafers are very thin, brittle chocolate cookies. The recipes in the old and new books are basically the same. The only minor difference is that the new book calls for semi-sweet chocolate cut into small pieces, while the old book calls for semi-sweet chocolate morsels.


The dough is mixed in a sauce pan, does not require a mixer, and is quick and easy to put together. While it is still warm, the dough is thin and more like a batter. It gets a little stiffer as it cools. There are no unusual ingredients and the only thing I didn’t have on hand was a jumbo egg. An extra large egg could also have been used, but all I had were large.


The note that accompanies this recipe characterizes these cookies as fragile, but they seem quite sturdy considering how thin they are. If properly packaged, they might even be suitable for mailing. I brought some to a family gathering last night and my mom thought they might make good ice cream sandwiches. I’m afraid they might be too crisp for that, but she brought some home and planned to give it a try. They taste very good, but are quite plain and not very exciting. They would certainly make a nice accompaniment to ice cream, though, as I think they are better suited to the role of a sidekick rather than star of the show.

Next time – “Chocolate Street” Cookies.

Nutrition Facts

Friday, November 12, 2004

Sugar High Friday – Try, try again…


Much as I love to make cookies, I’ve never had enough of a grasp of the science of baking to feel comfortable tinkering with a recipe. When it comes to cookies, I follow instructions. But for Sugar High Friday (SHF), as with Is My Blog Burning (IMBB), my goal is to create something that is my own (if for no other reason than so I can include the recipe in my post). Given that I failed to do so for the last SHF, the pressure was on for SHF2. The theme this time is Apples and the event is hosted again by it's founder, Jennifer of The Domestic Goddess.

As readers of my blog know, I’ve just started a long term cookie project. I’m planning (hoping) to make every cookie in Maida Heatter’s Book of Great Cookies, so of course it was one of her cookies that popped into my head when I was trying to come up with an idea. Her Cinnamon Almond Cookies are delicious – they have a cinnamon shortbread base covered with sliced almonds and topped with a lemon glaze. There’s a lot of cinnamon in the dough, enough to color the dough brown, but more importantly enough to give the cookies a distinctive cinnamon flavor. My idea was to take this base, add some pecans to the dough and then top the cookies with apple slices. The problems I anticipated were getting the apples and cookie base done at the same time, dealing with the moisture released by the apples, and making the apples stick to the cookies.

The last problem turned out to be relatively simple compared to the other two. I looked at apple tart recipes in my cookbooks and on-line and decided that apricot jam would be the perfect “glue” for this project. What I didn’t consider was that this would probably also contribute to the moisture problem. In my first attempt, I didn’t really address the moisture problem – I just hoped if I cooked the cookies a little longer and a little hotter there wouldn’t be a problem. I was wrong. Here’s the recipe from my first attempt…


Apple Tart Bars – Take One
(I don’t recommend you try this without making some adjustments)

2 sticks unsalted butter
1 cup sugar
2 tsp cinnamon
1 egg yolk
1 tsp vanilla
2 cups flour
1 cup finely chopped pecans
1/3 – ½ cup apricot jam
2 Granny Smith apples
1 tbs butter, melted
extra sugar to sprinkle on top

Preheat oven to 325 F. Butter a 10 ½ by 15 inch pan and line with parchment. Cream butter, add sugar and cinnamon and blend well. Add egg yolk and vanilla and blend. Gradually add flour at low speed and mix until incorporated. Add pecans. Press dough into pan and flatten (put wax paper on top and use a straight sided glass to smooth dough into an even layer). Warm the apricot jam in the microwave and stir to loosen it. Spread over the dough with a rubber spatula. Arrange thin slices of apple in a single layer over the dough. Brush melted butter over the apples and sprinkle with sugar. Bake for 40 minutes, raise temperature to 350 F and bake for 15 minutes more or until apples are nicely browned.

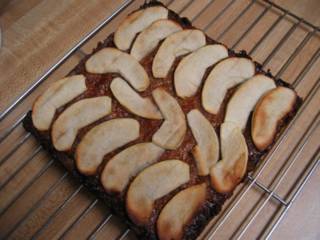
If you follow the instructions above, what you remove from the oven will look lovely and smell heavenly, but it won’t be a cookie. Actually, it tastes pretty good, but the texture is soft and wet. It might be good hot with some vanilla ice cream.

I decided to try again but this time I would bake the dough first, then add the jam and apples and bake some more. My concern with this method was that the cookie might overcook by the time the apples were well cooked. For my second attempt, I decided to cut the recipe in half.


Apple Tart Bars – Take Two
(this works, though it still needs some timing and/or temperature adjustments)

1 stick unsalted butter
½ cup sugar
1 tsp cinnamon
about ½ egg yolk (I probably used a little more)
½ tsp vanilla
1 cup flour
¼ cup apricot jam
1 Granny Smith apple
2 tsp butter, melted
extra sugar to sprinkle on top

Preheat oven to 350 F. Butter an 8 inch square pan and line with parchment. Follow instructions above to mix dough and spread in pan, but do not add jam or apples yet. Bake for 30 minutes. Remove and spread with warm apricot jam. Arrange apples over jam, brush with melted butter, and sprinkle with sugar. Bake until apples are browned, about 40 minutes. (With this temperature and timing the cookies were overdone – probably should start with 300 F, which is the temperature in the original recipe, and raise the temperature to 350 after the apples are added.)

I have one more idea about how to make this work. Bake the cookie without the jam and apples for 45 minutes at 300 F. Cool, cut into bars and store. Bake the apple slices separately until nicely browned. To serve, spread some apricot jam on the cookie and top with an apple slice. I haven’t tried this and I’m not sure it would be quite as satisfying as having the apple baked into the cookie, but it might be the only way to get the cookie and the apple done just right.

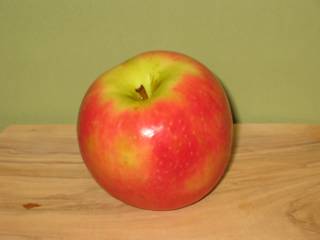
I came home this evening and considered making one last try, but opted instead for the perfect apple dessert… a Pink Lady apple all by itself. Oh so easy, but oh so good!

Monday, November 08, 2004

Mondays with Maida - Chocolate Chocolate-Chip Cookies


Page 19 in the old book / page 37 in the new book

The recipe for Chocolate Chocolate-Chip Cookies is one of 39 in the “Drop Cookies” section of the book. They are thin bumpy cookies that are very crisp and have a rich chocolate flavor. I compared the recipe in the old book to the one in the new book and there was one slight change. The new book calls for Dutch process cocoa but the old book only says cocoa. I happened to have Dutch process on hand so I used that. The other interesting difference is that in the old book, Maida Heatter frequently suggests lining cookie sheets with foil, but the new book now suggests using parchment paper. I remember that not too long ago parchment paper could only be found (at great expense) in cooking specialty stores, so I think this change reflects the times.

The dough went together quite easily and most ingredients were things I had on hand. The one ingredient that was a little unusual was light cream. The recipe calls for just two tablespoons. I can’t help but think that with all the butter in this recipe, skim milk could have been substituted without any noticeable difference. The other interesting ingredient is dark brown sugar. I don’t think I’ve used it with chocolate before, but it complements the chocolate beautifully.

These are simple drop cookies with no special handling. The dough is fairly stiff and spoons out easily. The one difficulty I had was with the baking. The recipe says that the cookies should be baked for 12 to 13 minutes and I found this to be too long. It wasn’t until the last sheet of cookies that I finally got the timing right – it turned out that 10 minutes worked best for me (and I think my oven runs a little cool). The longer the cookies were in the more they spread. The cookies that baked for 11 to 13 minutes became thin and lacey and the flavor verged on burnt. After 10 minutes the cookies were still very crisp after cooling, but held together better and had great chocolate flavor. The cookies shown in the picture above were baked for 10 minutes, the one below was longer.

If properly baked, these cookies are rich and delicious with a wonderfully crisp texture.

Next time – Santa Fe Chocolate Wafers.


baked too long

Nutrition Facts

Sunday, November 07, 2004

Mondays with Maida


I’ve written before about what a great book Maida Heatter’s Book of Great Cookies is – last week when I made her Chocolate and Peanut Butter Ripples and back in August when I made her Plain Old-Fashioned Sugar Cookies and Cobblestones. Please indulge me once more as I tell you a little more about what this book means to me.

The copy I have is from the eighth printing in October, 1982. I assume I purchased my copy either in 1982 or 1983. I don’t remember what other cookbooks I had then, but I’m pretty sure this was among the first. I was living in an apartment then and I don’t think my cookbook collection had yet swelled anything close to its present size. This book quickly became my favorite and cookies became “my thing”. My copy of the book is well worn and well loved. It falls open to page 193 (the best sugar cookie recipe) and other favorites with little coaxing. Over the next couple of years I gave copies to my mom, my sister, my great aunt, and my future sister-in-law. When my youngest brother got married, this book was no longer in print, so I had to give my sister-in-law-to-be a new Maida Heater cookie book.

A few months ago I discovered Jessica’s Biscuit and found that they have copies of Maida Heatter’s Book of Great Cookies. I snapped up five copies – one has gone to my youngest brother and sister-in-law, another to my brother Bob, and three are stashed away in a box under my bed. Two of these copies are for my nieces, Christina who is 6 years old and Cassidy who is not quite 5 months old, and the last is just in case. Actually, now I’m thinking I should have bought a few more!

I’ve got a number of favorites that I make from time to time, but haven’t tried many new recipes from the book in quite a while. After making the Chocolate and Peanut Butter Ripples last week I got thinking… I’d love to make all the cookies in this book (I counted and there are a little over 150). My plan is to start at the beginning of the book and work my way through it, making approximately one batch of cookies every week. I haven’t quite worked out what I’ll do with all the cookies, but I think it will be a lot of fun. I also really like the idea of documenting this project through my blog – I don’t know how long my blog will be around, but I’d like to think that Cassidy and Christina will be able to read it when they start making cookies from there own copies of the book.

By the way, the recipes in Maida Heatter’s Book of Great Cookies were reprinted in 1997, along with cookie recipes from two of her other books, in Maida Heatter’s Cookies. This book is still in print and is available from Amazon. I got the book out of the library and the recipes that I’ve compared are virtually identical, though it doesn’t have the charming illustrations found in the older book.

Please join me tomorrow and every Monday for cookies from Maida Heatter!