Friday, March 31, 2006

Farewell Phil

It was bittersweet day in my office. Phil, who you've come to know a little through his Monday cookie reviews, has moved on to bigger and better things - retirement! He has many interests outside of work, so I know he will put his new-found spare time to good use. He'll be fine - it's the rest of us I'm worried about.

Phil insisted that there be no party, no speeches, and we reluctantly complied - so what I couldn't proclaim to a few of my coworkers I will instead proclaim to the world. I know when and if he reads this, he will be squirming uncomfortably in his seat. Sorry Phil - it won't take long, I promise.

Phil is a great guy - I don't know how else to put it. From what I've seen he approaches everything (people, work, and even cookie reviews) in a caring, thoughtful way. In his farewell email to the office he commended everyone for their efforts to "get it right" in spite of the fact that "right" is often hard to pin down. I can't think of anyone who has tried harder in that regard. It was apparent in his work, but it was even noticeable in the reviews he did for my silly little cookie project. I remember him telling me one time that he had put half the cookie in the refrigerator to see what it would be like chilled (!). He generally mulled over his thoughts for several days before emailing me his often amusing and always kind reviews.

There's no doubt that Phil will be missed on the cookie panel, but most of all I will miss seeing him every day in the office. I'm sure we'll see each other from time to time and stay in touch by email, but it's the ordinary, everyday chitchat that will be lost and that I will miss.

OK, I'm going to wrap this up before I get too maudlin and embarrass Phil to death. Just two more things... I keep telling Phil that he needs to start a blog, but I don't think I've persuaded him yet. Feel free to twist his arm a little in the comments. Finally, I have a picture for you. I made cookies twice this week (there are two more of his reviews to look forward to) and asked Phil to pose for a picture with the last cookie. I told him I wanted him to do a thumbs up or thumbs down picture. So he comes in with this big old plastic nose...


Happy trails Phil!

Wednesday, March 29, 2006

Spinning Wheels


I don't know how to spin. I was looking at Charleen's beautiful new spinning wheel and thinking how I wish I did...

I do have a spinning wheel, though. In fact, I have two. They were made by my great uncle's father, Mr. Johnson. I never met him, but he was obviously quite talented. He also made a number of chairs - beautiful, spindly little things.

I hope I learn to spin some day. Pity it won't be on one of these.

Monday, March 27, 2006

Mondays with Maida - Viennese Linzer Bars


Page 116 in the old book / page 154 in the new book

I was so looking forward to these... I knew with gobs of raspberry jam in them they were bound to taste good, and with a lattice top they promised to be attractive too. They came out reasonably well, but that attractive lattice top proved to be elusive.

A crumbly, buttery mixture serves as the base of the cookie and as the basis for the lattice top. Most of the mixture is pressed into the pan and then a couple of tablespoons of flour are mixed into the remaining mixture. The mixture was on the dry side to start, so adding flour only made it more so. I had my doubts that it would hold together at all when rolled, but parts of it did. I probably should have gone with my instinct to add a little water or something, instead I tried to work with it as it was. What I ended up with hardly looked like a lattice, but it didn't look too bad. The biggest problem was that it was near impossible to brush on the egg wash. The brush kept picking up bits and pieces of the crust, so the only approach that worked was to dab it on. As a result, there were little pools of egg wash here and there rather than a nice even coating.

Not surprisingly, the jam is what stands out in these cookies. The cookie itself is lightly spiced with cinnamon and a touch of cloves. They were very good, but not outstanding. Funny thing was, everyone commented on how nice they looked - I guess some colorful jam peeking out here and there will work its magic even when the cook can't!

Here's the panel...

Suzanne: "The cookies were delicious. The cookie was moist and I like anything with raspberry jam. They were very pleasing to the eye since the top had a lattice look. Rating - 4.0"

Denny: "Loved the jam but cookie was very blah. Rating - 3.0"

Laura: "One word: Delish! 4.5 (but only cuz I don't really like raspberries). Rating - 4.5"

Phil: "If we eat with our eyes this cookie is a stained glass like work art. It starts there and gets better with each bite as one navigates the hidden tunnels of raspberry filling. Rating - 4.8"

Overall rating by the panel - 4.1

Next week - Polish Wedding Cakes

Nutrition Facts

Saturday, March 25, 2006

Alice doesn't live there anymore...


Alice is back! She has moved out of the Breadbox and taken up residence at thumbelina.pear. Her new blog has the baking and light cooking you probably remember her for, but will likely include some of her other interests as well. Look out for quilting and crafting in the future!

Alice will be signing her blog and comments t.p - but it's still Alice. Welcome back t.p!

Tuesday, March 21, 2006

BBM3 - A four month trek to Italy


There are about a dozen BBM3 packages which never arrived. Nancy's package for Pascale was shipped in mid November and four months later was finally delivered to Pascale - YES! Dare I hope that a few more will surface?

Hello Cathy,

Hope you are well. Do you remember me? I’m Pascale, from Italy and took part in your BBM 3 last November, but I’ve not received my package... until Thursday. Yes, it has finally arrived!

Nancy sent it to me from San Francisco on November 16: it took exactly 4 months to reach Italy – quite incredible. I guess Nancy would have taken the same time if she came here on foot and handed it over personally!!

Imagine my surprise when I arrived home and found a note saying there was a large parcel for me at the post office. Nancy’s package included various sugary snacks and also wasabi peas, which I had never tried before. And there was a very nice letter describing her Thanksgiving American/Asian traditions, together with two beautiful cards with pictures of the farmer’s market in San Francisco and interesting recipes. Finally, three food sections of her local newspaper and a nice picture of her kitchen. I enclose a picture of her package – Sorry for the poor quality, but my camera is quite old.

Have a nice day

Pascale

Sunday, March 19, 2006

Mondays with Maida - Aspen Date-Nut Fingers


Page 115 in the old book / page 153 in the new book

I am certain that Suzanne has now become conditioned to fear all cookies shrouded in confectioner's sugar. The moment I approached her with these she recoiled. She ate one - reluctantly - but I'm afraid the score was fixed in her mind before her first bite. A big fat zero. Honestly though, I liked them, as did others.

These cookies actually were very similar to last week's. They had smaller amounts of dates and nuts, and had some healthy additions: whole wheat flour, wheat germ, and oatmeal. The other important difference was that they had pecans rather than walnuts. The texture was very much the same, but I think the flavor was better. Once again these cookies had no butter in them - which makes for quite a different date bar than I'm accustomed to. They have a firm texture and are not overly sweet.

Here's the panel...

Suzanne: "I didn't think it was possible, but these date bars are even dryer and chewier than last week's bar. They just don't live up to Cathy's standard of excellence. Rating - 0"

Denny: "Excellent! 4.9 only because of no chocolate. Rating - 4.9"

Laura: "Crunchy, nutty, tasty, ... and good for me, too! Rating - 4.0"

Phil: "Seemed like just the right ingredient mix for the granola eating, birkenstock wearing, tree hugging, kumbaya-singing, bongo playing set. While the dates once again shined through and powdered sugar added a nice esthetic and touch of additional sweetener, the total cookie seemed a bit dry and dense. Rating - 2.0"

Overall rating by the panel - 2.7

Next week - Viennese Linzer Cookies

Nutrition Facts

Saturday, March 18, 2006

Weaving: Now where were we?


I sort of left you hanging didn't I? Sorry about that... actually, not only haven't I been blogging, I've been spending precious little time weaving. I really have got to get my priorities in order!

I have spent a few hours weaving and have about half a towel to show for it. It took a little while, but I've gotten to that point where the pattern is familiar and I've established a rhythm... but I'm getting ahead of myself.

When we left off, I had finished threading the heddles and sleying the reed. The only remaining steps are to remove the raddle, tie the warp to the front apron rod, tie up the treadles, weave a short header, wind some bobbins, and then weave, weave, weave!

After removing the raddle, I folded up my loom and moved it to its new home - my spare room, formerly know as "Leo's room" (yes, my cat had a room, or I should say his stuff did) and before that as my "sewing room". It is now my "weaving/sewing/craft room" - yay! Folding and unfolding the loom with the warp on it was horrible. It can be difficult for one person anyway, but not having done it in a while made it worse. While trying to fold it, I did something wrong, forced it, and managed to crack the back beam. The crack is small and I think (and hope) superficial, but it was enough to convince me that I needed a place to permanently set up the loom rather than folding and unfolding it repeatedly.


So, after I got the loom situated, I finished up the last few steps. Tying the warp to the front apron rod is pretty much as it sounds - you take small clumps of the warp and tie it to the rod. Because it is so important to have even tension across the width of the warp, this is an iterative process. You continue to adjust the knots until the tension in the warp feels (lightly pat the warp with an open hand) about the same all the way across. This is one step that I do differently from how I learned in class. Deborah Chandler recommends in her marvelous introduction to weaving, Learning to Weave, that you use square knots and tie the first half of the knot and then make all your adjustments before tying the second half of the knot. This works very well. It's also easier and saves wear and tear on the warp as compared to the way I had been taught.


Here just the first treadle has been tied up

The next step is to tie up the treadles. On my loom, this is really simple - I have nylon ties hanging from each shaft and I just need to attach the proper ties to the various treadles. For this pattern I am using four treadles and it happens that each lifts two shafts, though a treadle could be used to lift just one shaft or it could be used to lift three or more shafts.


After the treadles have been tied up, you're essentially ready to weave. There is just one problem - because the warp has been tied to the front apron rod in clumps, the spacing is a little funny. But by weaving a few rows with something heavy - like strips of fabric or clothesline - the warp will become evenly spaced. Now you really are ready to weave!

I usually use something called a floating selvage to ensure that the edge of the fabric is properly interlaced, regardless of the pattern. This is a warp thread on each edge of the warp that is not threaded through a heddle. When you throw the shuttle you always enter the shed by going over one of the floating selvages and exit by going under the other. You can see them in the second photo above - they "float" above the other warp threads since they are not held down by a heddle.


To weave you step on the proper treadle(s) to raise the shafts, throw the shuttle, release the treddle(s), beat the weft into place, and repeat. When you throw the shuttle you lay the weft at an angle so that it doesn't pull too tightly on the edge of the fabric when it's beaten into position. I usually give the weft a gentle tug towards me after each beat it to neaten it up a little.

I should be zipping through these towels at this stage, but as I said earlier, I just haven't been spending much time weaving this week. I intend to do something about that... starting tomorrow!

Thursday, March 16, 2006

Off Topic...

Not weaving, not food... I'm talking ecards. I just have to give a little plug for the most wonderful ecards you've ever seen. If there were such a thing as artisinal ecards, these would be them.

They are created by Susan of Visual-Voice.net, a great blog with beautiful photos and gentle thoughts. I became aware of her blog and Banjo Bunny ecards through her Advent Calendar, an amazing creation which can only be viewed during advent. (I read somewhere that it will work if you change the date on your computer, but I haven't tried that.)

Her ecards appear to be based on vintage cards and postcards, to which she has added animation, music, and humor to create something truly unique. There are four cards available at the moment: a St. Patrick's day card, a birthday card, a "Be Mine" card, and an "Olive You" card. The only price for sending a card is that you'll be added to the Banjo Bunny mailing list, which will bring you a monthly newsletter.

Tomorrow is St. Patrick's Day - better hurry!

Monday, March 13, 2006

Mondays with Maida - Honey Date-Nut Bars


Page 114 in the old book / page 152 in the new book

After last week's cookies, these were a let-down. They weren't terrible, just blah. The fact that they have no butter was the first strike against them and, in spite of a generous amount of dates and a whole cup of honey, they weren't especially sweet. They just had no spark. All together, a very unmemorable cookie.

I have a wonderful family recipe for date bars and was also crazy about Lindy's Chinese Chews, so when I have an urge for date-nut bars, I don't think I'll be making these.

Here's the panel...

Suzanne: "The texture was more like stale, dry bread than a cake texture. It was very chewy. This was probably my least favorite of anything Cathy has prepared for us. Phil knew the right day to be sick and out of the office. Rating - 0"

Denny: "I'd give them a 3.0. A little disappointing as the name sounds really good. Rating - 3.0"

Laura: "Tasty, but a little dry for my liking. Rating - 2.0"

Terri: "Very chewy, a little on the "dry" side. Just the right amount of dates and nuts. Rating - 2.0"

Overall rating by the panel - 1.8

Next week - Aspen Date-Nut Fingers

Nutrition Facts

Saturday, March 11, 2006

Communion Bread


I've dallied over this post for weeks now, adding a little now and then but mostly leaving it to sit for days on end as a draft. It's long past time to send it on its way, so off you go little post!

Part of my reluctance has been due to some uncertainty that this would be of interest to anyone. Maybe it won't... but when I look at the question the other way... would I be interested in a post on this subject or, more broadly, on the subject of religious traditions involving food, I am confident in the answer - yes! The other cause for delay was that I hoped to include some historical background, but had some difficulty coming up with much of anything.

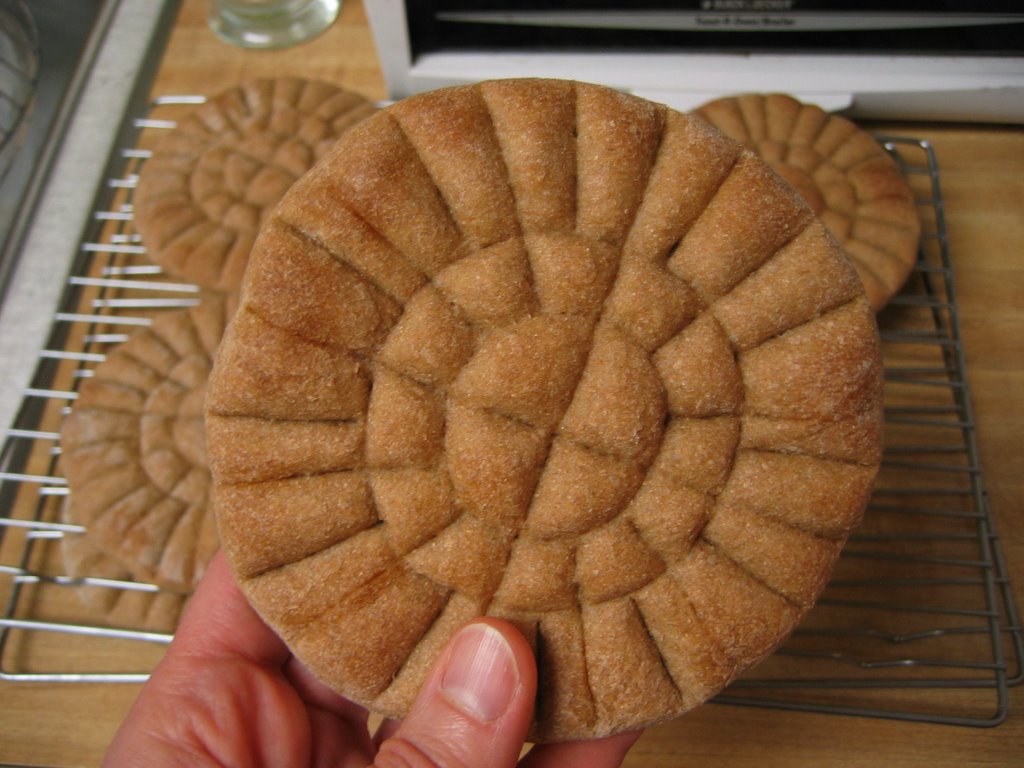
Every two months or so it is my turn to bake communion bread for my church. It's a simple recipe for unleavened bread consisting of just whole wheat flour, all-purpose flour, and water. The ingredients are stirred together, kneaded, and then allowed to rest for a few minutes. They are then shaped, cut and baked.


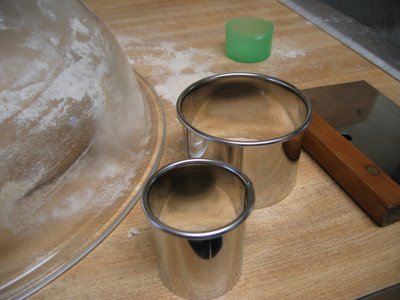
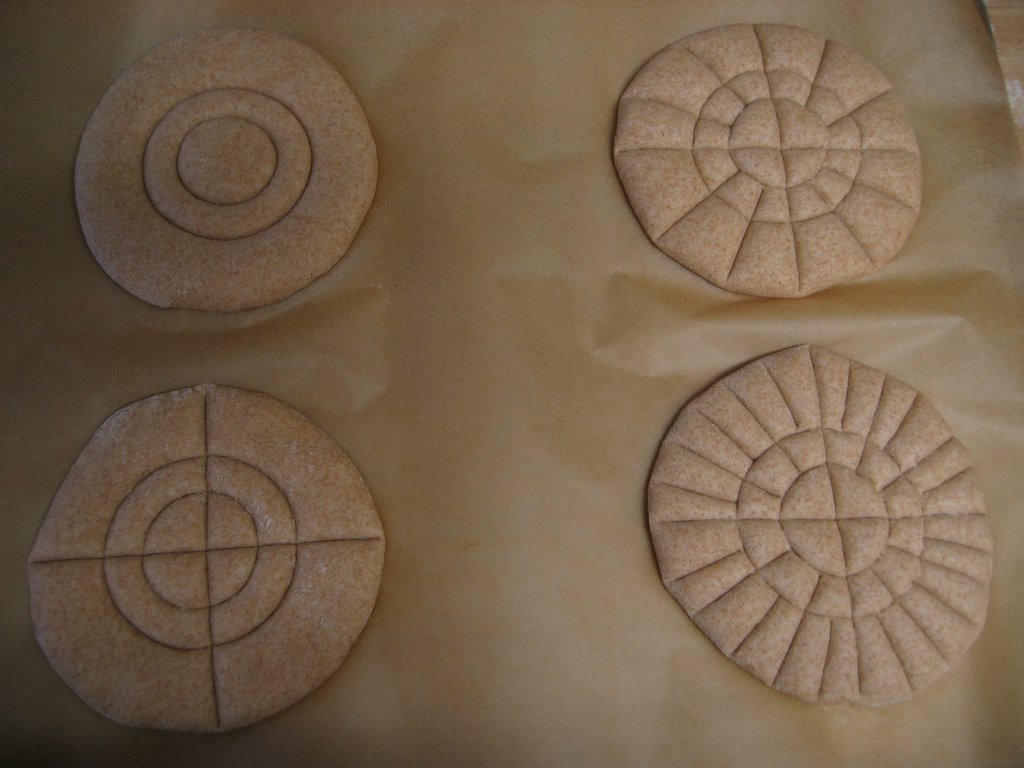
My tools are simple: a couple of biscuit cutters and a bench scraper. The first time I made the bread (which was a number of years back), I didn't have a biscuit cutter that was the appropriate size for the inner-most circular cut. As I so often do, I had left the bread-making until the last possible moment, so I had to quickly improvise. I had a plastic coffee measure that was the right size, so I hacked at the handle with some scissors, pulled and twisted it until it finally came off. I tried my new cutter and it cut beautifully, the only problem was it created such a suction that it was difficult to pull away from the dough. I again dipped into my kitchen toolbox and found a sharp, two-pronged fork which I plunged (with some difficulty) into the closed end of my cutter creating some "breathing holes". Problem solved! My trusty little green cutter served me well for many years and even though it is now retired, I can't bear to throw it away.


The recipe makes eight loaves and each loaf is cut into forty pieces. Most of the time while I'm making the bread, I don't really think about its significance, but when I come to cutting it, particularly when I make the two long cuts - like a cross - I will silently give it a little blessing.

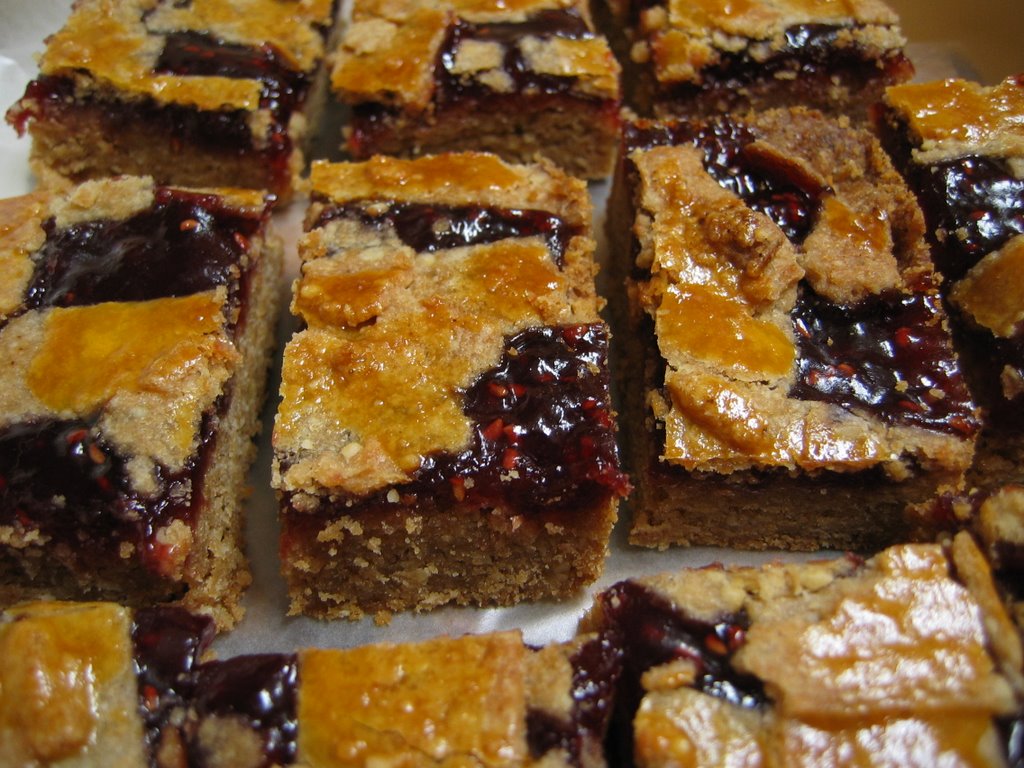
The baked bread has a nutty sweetness that is very good. Of course, I've never eaten more than one small piece at a time.

When I was very young, the only type of communion "bread" I knew were those thin white wafers. At some point (the mid seventies?), homemade communion bread similar to that above was used on occasion. At the church a attend these days, the homemade bread is used routinely and those little white wafers are used only when and if the bread runs out. Anyway, I was wondering how it came to be that those wafers were used for communion. I'm not sure there is a definitive answer to that question. This fascinating history of wafers and waffles says that "The introduction of the ritual wafer into the West cannot be accurately dated, although in the form taken over by Christians, it may have arrived in connection with the cult of Osiris once found throughout the Roman Empire." The other interesting fact I was previously unaware of, is that the eastern Christian church uses leavened bread for communion, apparently believing it to be symbolic of Christ's resurrection.

So that's my story... and guess what? It's taken me so long to write this, that it's my turn to make bread again next week!


Update: I've had several requests for the recipe, so here it is...

Communion Bread

4 1/2 cups whole wheat flour (540g)
1 1/3 cups all purpose flour (170g)
2 1/4 cups warm water

Preheat the oven to 450 F.

Mix flours together, then add water all at once. Stir until flour is moistened and begins to "clean" the sides of the bowl. When I make the bread I find there's still quite a bit of flour that is not incorporated into the dough at this stage - that's fine. Dump the whole mess out onto the counter or a board and begin kneading. Knead for 5 minutes or until smooth - you may need to add a little flour as you go if it becomes sticky (use whole wheat flour). When done kneading, cover the dough and let it rest for 5 minutes (I just leave it on the counter and turn the bowl upside down to cover it).

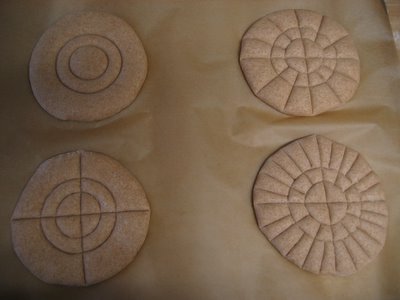
Divide the dough into 8 parts (I find a kitchen scale is very helpful here). Roll each piece into a ball then press into a circle about half an inch thick (it should be about 3 1/4 inches in diameter). Score each loaf into 40 pieces (see the photos above) - cut the smallest circle first, then the larger circle, then cut two straight lines at right angles all the way across the circle, then cut each quarter of the two outer circles into thirds (two cuts in each quarter), then cut each section in the outermost circle in two. When making cuts, cut all the way through or nearly so.

Place loaves on cookie sheets lined with parchment or lightly oiled. Bake bread for 15 to 18 minutes until the center is firm and loaf sounds hollow when tapped on the bottom. Cool on a rack.

Monday, March 06, 2006

Mondays with Maida - Texas Cowboy Bars


Page 112 in the old book / page 150 in the new book

Now we're talking! These cookies have an obscene amount of butter in them, but there were just wonderful... thick, gooey, moist, ... delicious!

A crumbly oatmeal mixture, which is used for both the base and the crumb topping, is interrupted by a sweet, jam-like date layer with a lovely lemon finish. While size-wise these bars don't at first appear intimidating (24 bars from a 9-inch pan), by weight they are massive. After sampling one, I packed the box with the remaining bars, lifted the box to move it, and was shocked at it's weight. For fun I put it on the scale - 3 1/2 pounds!!!

I love these cookies just as they are, but am very tempted to try cutting back on the butter. The recipe currently calls for 2 sticks (8 ounces) of butter and I'm willing to bet that you could leave out half a stick of butter and it wouldn't be missed. The filling for these cookies was fantastic - one of those things where you can't stop licking the spoon. The addition of lemon rind is a surprising (and delicious) twist.

Everyone enjoyed these - even one coworker who dislikes walnuts and is not fond of dates - and the panel was no exception...

Suzanne: "Delicious! The date filling made this bar moist and the filling almost tasted like chocolate to me. This was a great combination of oatmeal, walnuts, and date filling. Rating - 4.9"

Denny: "Excellent, just sweet enough and crunchy. If they had chocolate I'd give them a 5. So, only a 4.5. Rating - 4.5"

Laura: "Yummy, crunchy, nutty, chewy - Fabulous! Rating - 4.0"

Phil: "Bet you can't have just one. While a substantial cookie, the combination of ingredients punctuated by date filling really worked for this taster. Rating - 4.7"

Overall rating by the panel - 4.5

Next week - Honey Date-Nut Bars

Nutrition Facts

Thursday, March 02, 2006

Weaving: Ready, Set, Go!


Funny thing about "weaving", a major chunk of the time and effort that goes into a weaving project is not spent actually weaving. Normally, there's a considerable amount of effort that goes into planning your project; then you must prepare the warp to go on the loom, and then you must "dress" the loom. In order to simplify things this time around, I short-circuited the planning step by choosing a project from A Handwoven Treasury (which also happens to be something I've made before).

I'm making dish towels ("Keep it Simple Towel" on pages 60-61). These towels are made of unmercerized 8/2 cotton, which is absorbent, inexpensive, available in an endless variety of colors, and easy to work with. In my opinion, it also produces beautiful cloth. Quite some time ago I purchased a 25-pound grab bag of the stuff. Not surprisingly, I got some pretty strange colors, but there were some good ones too. And actually, I suspect even the colors that look awful on the cone, like the one above - a hideous pinkish beige, will work up into an attractive end product.

For these towels I am using white for the warp (the lengthwise threads in the cloth) and plan to try out several different colors for the weft (the crosswise thread in the cloth). The process of preparing the warp is more involved than you might think. I remember the first project in my weaving class... the teacher revealed each step only as the prior step was completed, all the while reminding us to keep even tension, etc. By the time our warps were ready to go on the loom, they were like our babies. When we were instructed to cut the end off after beaming the warp (i.e. rolling it onto the back beam of the loom), my fellow students reacted with shock, "you want us to do what!?!"


Warping reel with guide string

To wind a warp you need either a warping board or a warping reel. I have a reel and am very happy with it. We used a board in class - it takes a little longer, can be hard on your shoulder and wrist, and can't accomodate a long warp like a warping reel can. I'm going to gloss over this step with just a couple of photos, but there's actually a whole (very good) book on the subject.


Warping reel with the cross on the right and counting thread on the left

When you wind a warp on a warping board or reel, you're not only measuring it out, you're creating "the cross" - a really simple and clever way of keeping all the threads in order through the process of dressing the loom.


The finished warp - chained and ready for the loom

I learned to warp the loom from back to front, which means you wind the warp onto the back beam, then thread the heddles, then sley the reed, then tie the warp to the front beam. Warping from front to back is an entirely different process. From what I understand, each method is suited to particular situations, so it is probably a good idea to become familiar with both approaches. I have not yet attempted warping from front to back, but it's on my list!

When warping from back to front, you use something called a raddle to space the warp threads correctly across the back beam. So after putting the lease sticks in the cross, the first step is to distribute the threads into the raddle sections. The number of threads you put in each section depends on the size of the section (each is half an inch on my raddle) and the sett of the cloth you will be weaving (20 ends per inch, or 20 epi for this project).


The lease sticks are just behind the raddle


The warp threads distributed in the raddle sections

After the raddle is loaded, the warp is wound onto the back beam. Now, in my mind, is when the fun begins! I'm not entirely comfortable with the process of winding the warp and beaming the warp, so I get a little stressed during that part. But I really enjoy threading the heddles and sleying the reed...


Threading the heddles

This pattern uses four shafts (a shaft is the frame that holds the heddles and which can be raised to create a space or shed, through which the shuttle can be thrown). Each warp thread is threaded through one heddle in one of the shafts. How they're, threaded together with the treadling, determines how the fabric will look.


Sleying the reed

The reed keeps the warp threads spaced correctly while you are weaving. It sits in the beater and is what is used to push the weft into place after the shuttle is thrown.

Just a couple more small steps and we're ready to weave!