Tuesday, June 29, 2004

Unexpected Results: Apricot Jam

I have made apricot jam every June for at least the past 10 years and I’ve never had it turn out like this. It seems to taste okay, but it sure is ugly. It started out so well, too. The apricots were some of the nicest I’ve ever used – perfectly ripe, with really nice color and very few blemishes.


promising beginnings

My grocery store carries canning supplies for a limited time each year and I shopped for pectin a little late this year. Consequently, supplies were low and I was forced to buy a different brand than I normally use. I compared the two brands’ recipes for apricot jam and the ingredients and amounts were the same for both, so I didn’t worry about it much.

I like to cut the apricots in eighths and then pulse them a few times in the food processor. Cutting them in pieces this size first is quick to do and allows the food processor to cut them fairly uniformly. You still get a few nice chunks in there, but they won’t be too big.


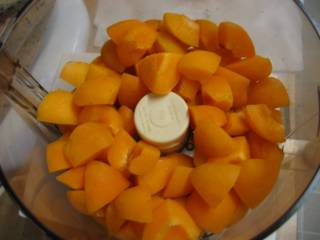
unpeeled apricots, pitted and cut in eighths

You need to stir the fruit and pectin mixture continuously until it boils and then add the sugar and continue stirring until it returns to a boil. This takes a little while. While you’re stirring this steaming mixture, there’s a huge vat of boiling water waiting for your jars of jam and a smaller pot with the lids simmering on a back burner. Thank goodness for air conditioning!
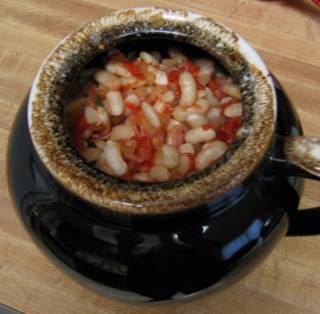

trouble brewing

When the apricot mixture was ready I had quite a bit of foam, so I started to try to remove some of it before ladling the jam into the jars. Before too long I realized the entire mixture was pretty much just foam. I gave up on the idea of removing it, and just went ahead and put it into the jars, and processed them in the canner for 10 minutes. It’s the strangest looking jam I’ve ever seen. Not only is it all foamy, but some of the jars (the ones that were ladled out first, I think) separated! It was really very discouraging.


this year's ugly jam - notice the separation

I puzzled over this for quite a while – what was different this year? Of course, the first thing that came to mind was that I had used a different brand of pectin. I haven’t ruled that out, but I have trouble believing that is the reason. Then I vaguely recalled that I added a small amount of butter to the fruit mixture in past years. I couldn’t remember if this was a suggestion I had read somewhere or if it was in the instructions for my regular brand of pectin. I checked the old instructions and sure enough, they say that you can add ½ teaspoon of butter to the fruit and pectin mixture to reduce foaming if desired. So I guess that ½ teaspoon of butter makes a big difference. Can anybody think of any other reason the jam might have foamed so badly?


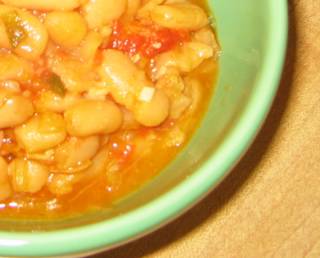
beauty and the beast - this year's jam is on the left, last year's is on the right

Sunday, June 27, 2004

Trying New Things: Olives

Olives are one of the foods I’ve avoided for a very long time. They pop up from time to time in a salad, pizza or other dish ordered in a restaurant, but I typically pull them out before I start eating and pass them over to someone who appreciates them. I don’t think I had ever tried anything other than the basic green and black grocery store varieties until this evening.

My grocery store has an olive bar, so I decided that this would be a good way to sample several varieties without spending too much. Many of the olives at the olive bar were unnamed large green olives with various stuffings, others were labeled “assorted”, and unfortunately quite a few had no label at all. I picked out a small selection – I went for the ones that had a specific name and then picked one of the stuffed ones as well. I ended up with Niçoise, Picholine, Moroccan oil-cured, and one stuffed with sun-dried tomato. I had a total of 8 olives and they cost me a whopping 24 cents!

When I got home, I poured myself a glass of wine, grabbed a big glass of ice water, and began my taste test. Obviously the most noticeable thing about olives is that they are salty. In fact, to my unpracticed palate they are so salty that it is difficult to differentiate one from another by taste. The two characteristics that I could distinguish were the degree of saltiness and the texture. The Moroccan oil-cured olive was very soft and incredibly salty – pretty awful. The Niçoise and Picholine olives were similar to each other in saltiness, but the Picholine olive was much firmer than the Niçoise. The large stuffed olive was somewhere between the Niçoise and Picholine in texture, but similar to both in saltiness. I preferred the Niçoise and Picholine olives over the others.

After I finished eating the olives, I read a little about them. I found out Moroccan oil-cured olives are considered bitter and better for cooking then snacking. Maybe I should have done a little research before I went to the olive bar!

The olive bar is nice in that it allows you to buy a selection of different olives at low cost and, if desired, in small quantities, but the downside is that you know very little about what you’re getting. So now they question is, am I ready to commit to a whole jar of olives? Guess I could always put them out for company…


left - Picholine, top middle - stuffed, bottom middle - niçoise, right - Moroccan oil-cured

Saturday, June 26, 2004

A Sad Story

My blueberry season has come to an abrupt end.

This was to have been about blueberry muffins, but last night while gathering ingredients for the muffins I glanced out the back window and noticed there was a bird flying around inside the net surrounding my blueberry bush. I had just put the net on last weekend with the intention of getting one more good picking and then leaving it off. Even with the net on, the birds had continued to congregate there – it made me think of one of those suet blocks in a wire cage. The birds would perch on the net and fish out a blueberry from inside.

Anyway, I headed down to the basement and outdoors to try to free the bird. When I got closer I realized there were two birds flying around inside. I started pulling up the stakes and trying to untangle the net from the bush. Then I saw it – there was a dead bird on top of my blueberry bush, under the net, with his head caught in the net. I think he strangled trying to get out. Until that point I had been thinking I would remove the net, pick as much as I could before dark, and then leave the net off. Suddenly these blueberries lost their appeal.

So then the rescue and recovery mission began. The two birds flew out without much ado. In fact, I didn’t even notice when they finally escaped. It was a little more difficult to remove the dead bird. I was squeamish and he was really trapped in the net. I ended up having to cut a piece out of the net to free him. Now the entire net and the bird are sitting in front of my house waiting for the trash pickup.

I did make blueberry muffins last night (with berries picked last week). I ate one and gave the rest away.

I am leaving the remaining blueberries for the birds.

Wednesday, June 23, 2004

Leftovers

I’ve been eating a lot of leftovers of late. Most recipes aren’t made for single people, so leftovers are plentiful at my house. When I cook something new, I try to put at least one portion in the freezer (unless freezing is obviously out of the question). If it’s something I’m likely to make again, it’s helpful to know how it will hold up in the freezer.

Usually I prepare my leftovers as expeditiously as possible by simply reheating them in the microwave. But sometimes “same old same old” just doesn’t cut it and some sort of transformation is in order. I recently turned some of my Tuscan-Inspired Baked Beans into soup – it was easy and really tasty.


Beans and Greens Soup

2 cups chicken stock
1 ½ cups Tuscan-Inspired Baked Beans *
3 leaves of Dinosaur Kale, cut into ¼-inch slices
salt and pepper to taste

Combine the chicken stock with 1 cup of the beans in a medium saucepan and puree with a stick blender until smooth. Stir in remaining beans and bring to a simmer. Add the kale, cover and simmer 10 minutes. Season to taste and serve. Serves 2.

* You could substitute canned beans, but if you do you might want to add a little tomato, garlic, olive oil, and/or meat (bacon, ham, or pancetta) to the mix.


Dinosaur Kale 


Beans and Greens Soup 

Sunday, June 20, 2004

Is My Blog Burning? Red Plum and Snapper en Papillote

My first ever IMMB! This time it is the fish edition hosted by Wena. I must admit I approached this event with some reluctance. As I’ve said before, I normally do not eat seafood. So, not only was this something I was not looking forward to eating, but it was something that I had not the slightest idea how to prepare.

I started out by browsing Mark Bittman’s How to Cook Everything. When I came across his recipe for “Red Snapper or other fillets in Packages”, I knew this was the technique for me. I wouldn’t have to deal with heads, tails and bones, and it was supposedly foolproof. I also liked the idea that I could prepare a single serving and that I could be a little creative with what I included in the packet with the fish.

At the market, I browsed for a few minutes before committing myself to making a purchase. Someone was cleaning the case, so the front was flipped open with nothing between me and the fish. I didn’t smell anything. This was a good sign (or so I’ve read). The prices were a little shocking, though. Seems like in years gone by fish was considered an inexpensive alternative to meat, but here I was looking at red snapper fillets for $17.99 a pound! There were a number of other choices that were much less expensive, but knowing nothing about fish I decided to stick with the name I knew from Mark Bittman’s recipe. I finally took the plunge and picked my fish.

While in the store, I had noticed that the plums looked really nice. I thought this might be a good seasonal ingredient to include in my packet. I then decided I liked the idea of sweet and hot, so I would include some jalapeno pepper and onion. I wasn’t sure what else (if anything) I should include, so I went to Google and entered plum jalapeno onion so that I could browse other recipes with these ingredients and see what else was used. I found a number of salsa recipes with these ingredients and after reviewing them, I decided to add lime juice and cilantro to my recipe.

Putting the packet together took no time at all. Actually, in the interest of full disclosure, I must tell you that I made two packets. I was afraid my plum and jalapeno concoction might be too strange, so I had a fall-back packet with onions, peppers, tomato, white wine, and spinach. It turned out that I much preferred the fish with the plum. The plum became very soft and sweet and the heat of the jalapeno complemented it perfectly. I am not yet completely won over to fish, but let’s just say my curiosity has been aroused.

Red Plum and Snapper en Papillote

½ red snapper fillet (about 6 oz)
½ lime
salt and pepper
1 red plum cut into ¼-inch wedges
several thin wedges of onion (vertical slices)
½ jalapeno pepper, seeded and finely diced
several sprigs of cilantro

Preheat oven to 450° F. Score the skin on the fillet then sprinkle with salt and pepper on both sides. Squeeze lime over both sides of fillet. Tear off a sheet of parchment which is large enough when folded in half to accommodate the fillet with some room to spare. Fold the parchment in half and trim the corners. Place it on a baking sheet and position the fillet near the fold. Arrange the plum and onion over the fillet, sprinkle with the diced jalapeno, and place the cilantro sprigs on top. Crimp the edges together to form a pouch with a little extra space inside. Bake for 20 minutes. Remove from the oven and poke a hole in the packet. Allow the packet to sit for 5 minutes before serving.


ready to assemble my packet 


mmm...fish 

Sunday, June 13, 2004

The Blueberries Are Coming! The Blueberries Are Coming!

I’ve lived in my house for going on 20 years now. Not long after I moved in I purchased a blueberry bush and planted it in my backyard. It’s pretty fuzzy now, but as I recall the place where I bought it had only one and it wasn’t labeled with the variety, instructions, or anything except possibly “Blueberry Bush”. It may not have even said that - I think it had a few berries on it, so it was pretty obvious what it was.

The first few years didn’t yield many berries for me. The birds had a nice snack, but I seldom got more than a handful. The amazing thing was that my bush did bear fruit. I had always been under the impression that blueberries required cross-pollination. Either that’s not true, or there are other blueberries in the neighborhood.

My bush got bigger every year, but it wasn’t until I discovered bird netting that I had blueberries in abundance. After I started using the netting, I would pick up to 20 pounds a year! They usually come in June and July for a period of about a month. They keep well in the refrigerator, so I have them for almost 2 months in the summer. Every year I marvel at the fact that for next to no effort I have all these blueberries – it truly is a gift. The hardest part is picking them. No, actually the hardest part is putting that netting on. In fact, I’m not sure I’ll be able to put it on this year. Last year, I gave up on it after my first picking because the bush has gotten too big to completely enclose in the netting. And if you don’t completely enclose it, you might as well leave it off because those birds will find a way in. They seem to have a harder time finding their way out.


ripening blueberries 


my blueberry bush - no netting yet 

Saturday, June 12, 2004

Pumpkin Corn Meal Muffins

The other day Clotilde’s post on Chocolate & Zucchini was about corn muffins she had made from a mix. She asked if anyone had from-scratch recipes for corn muffins to recommend. A recipe for Pumpkin Corn Meal Muffins submitted by a reader was really tempting, so I copied it into my recipe software (Living Cookbook). This evening I was having leftover chili for dinner and I thought I’d make the muffins to go with it.

When I had first seen the recipe, all I had really noticed was the pumpkin and whole wheat and I’d thought “ooh -- yummy and healthy!” Looking at it again, though, I noticed it had ½ cup of butter, ¾ cup of brown sugar, and 4 eggs. I went back to Living Cookbook and calculated the nutritional data. Ouch. Each muffin had 248 calories and 10 grams of fat.

Emboldened by a couple of recent successes in modifying and creating recipes, I decided to try my hand with lightening this one. I took the things I liked from the Pumpkin Corn Meal Muffin recipe (pumpkin, whole wheat flour, brown sugar, and spices) and used my regular corn bread recipe as a guide. I was worried about the muffins being too heavy, so I used half all-purpose flour and half whole wheat. I also added a little ginger.

On paper they looked good - 160 calories and 6 grams of fat. Not exactly diet food, but still quite a bit lighter than the original. Now the only question was, had I completely messed up the recipe? I headed down to the kitchen to find out.

I’m happy to report that I got very lucky and came up with something I liked on the first try! They’re only slightly sweet – perfect as an accompaniment to chili. If you want them sweeter, you could increase the sugar or serve them with apple butter or jam.


Pumpkin Corn Meal Muffins

1/4 cup vegetable oil
1/3 cup light brown sugar
1/2 cup milk
2 eggs
1 cup canned pumpkin
1/2 cup whole-wheat flour
1/2 cup flour
1 cup yellow cornmeal
1 tbs baking powder
1 tsp ground cinnamon
1/2 tsp salt
1/4 tsp ground cloves
1/2 tsp ground ginger

Heat oven to 400° F. Lightly coat 12-cup muffin pan with vegetable cooking spray.

Whisk together dry ingredients (flours, corn meal, brown sugar, salt, baking powder, cinnamon, ginger and cloves) in a large bowl. Use your hands to break up the brown sugar if necessary.

In another bowl, whisk the eggs briefly. Whisk in the oil, then the pumpkin, and finally the milk.

Using a rubber spatula, stir the wet ingredients into the dry ingredients just until they are blended together.

Spoon the batter into the muffin pan. Bake about 20 minutes or until a toothpick inserted into a muffin comes out clean. Remove from pan and cool on a wire rack.

Servings: 12


Pumpkin Corn Meal Muffins 

Tuesday, June 08, 2004

Buried Treasure

The web is a wonderful thing. It brings people, places and information from all over the world right into our homes. It can also bring you recipes from all over the world. After having successfully translated the recipe for Consommé con Tempestina, my appetite was whetted for more real Italian recipes. I knew they were out there.

And they were. Here are just two sites that have loads of recipes:

Donna Moderna
Cosa Cucino

I have a little familiarity with Italian since at various times I’ve attempted to learn it on my own. More importantly, I have a good Italian dictionary. Although Google provides some language tools, including translation of Italian to English, the translated text will at best give you a general sense of how it reads – which usually isn’t good enough for a recipe. In fact, Google’s translations can be downright amusing. Here is Google’s translation of a recipe for Pine nut Biscotti:

Worked until obtaining a smooth and soft paste 300 g of sifted flour, 120 g of spezzettato and already soft butter, 3 egg yolks, 150 g of sugar, the grattugiata rind of 1 lemon and a pizzico of knows them. Incorporated 1 bustina of I leaven not too much vanigliato for cakies and 50 g of sminuzzati pinoli fine. Stirred, then obtained from the paste many large littles ball like inserted walnuts and to the center of ognuna 1 pinolo. You cover one plate with paper from furnace. You align the paste littles ball distancing them one from the other, therefore fairies to cook for 15 minuteren in preriscaldato furnace to 180 °C.
Fairies to cool completely biscotti and, before serving them, spolverizza you them with sugar to veil.


Some words are left in Italian, others are translated into the wrong words (fairies?), and the word minuti (minutes) is consistently translated to minuteren (that’s not in my English dictionary). But still, it’s a starting point. Here’s a glossary of Italian cooking terms which may also be helpful. Fortunately, the language and format of recipes are universal. So even if you have trouble translating every single word, you can fill in many of the blanks yourself.

Once you’ve translated the recipe to English, you’ve got to worry about the weights and measures. If you have a scale, you can easily weigh the ingredients. If not, you can try to convert the weights to volume measurements by using information provided on nutrition labels (i.e. 1 teaspoon of sugar is 4 grams, so 100 grams of sugar is 25 teaspoons, which is half a cup plus one teaspoon). Liquid measures are straightforward: 240 ml = one cup of liquid. Last, you need to convert the temperature. To convert degrees Centigrade to degrees Fahrenheit, multiply the number given by 1.8 and add 32, or just go here. I’m still trying to figure out how much baking powder is in one bustina (envelope or sachet). I’ll have to get back to you on that.

Sunday, June 06, 2004

The Italian Experiment – Part II: Confetti Soup

Last October I visited Italy with some of my family. We rented a beautiful house in Imprunetta, which is just south of Florence. The house had a huge kitchen and the owner was apparently an avid cook, as the adjoining room had shelves and shelves of cookbooks and cooking magazines. It was a bit frustrating that they were nearly all in Italian, but I still enjoyed browsing through the magazines. I copied one recipe in Italian to bring back as sort of a souvenir. With the assistance of my Italian dictionary and the web, I was able to translate it to English, and last night I prepared it for dinner!

The recipe is for “Consommé con Tempestina” which translates to “Consommé with Confetti”. It is a clear broth with colorful bits of vegetables and is garnished with tiny little puffs that are similar to cream puffs. The recipe refers to the puffs as confetti, but the vegetables also resemble confetti. As I was dicing them, I realized that they must have been selected not just for their flavors and textures, but for their colors as well, for they are the colors of the Italian flag: green (zucchini), white (celery root), and red (roasted peppers).

If you have the roasted peppers prepared ahead, the only time consuming part of this recipe is making the puffs. The dough is relatively simple, and doesn’t take long to put together. You then use a pastry bag with a small round tip to shape the puffs. I think the tip I used (Wilton #4) was too small – I had a terrible time trying to squeeze out the dough. A larger tip would probably have made quicker work of this step. I ended up discarding much of the dough because I didn’t have the strength press it all out.

This is a beautiful soup with a novel garnish and it tastes pretty good too!


Consommé con Tempestina

¾ liter consommé (about 3 cups, I used homemade chicken stock)
100 g flour (about ¾ cup)
2 eggs
1 zucchini
2 or 3 slices of celery root
½ of a large roasted red pepper
30g butter (about 2 tbs)

Put 2 deciliters (about ¾ cup) of water, the butter and a pinch of salt in a saucepan and bring to a boil. Add the flour all at once and stir until the mixture pulls away from the sides of the pan. Allow it to cool slightly, then mix in the eggs one at a time.

Lightly butter a baking sheet and line it with parchment (you just need enough butter to hold the parchment in place). Place the dough in a pastry bag with a small round tip and press the dough onto the sheet forming many “confetti” (I made them about the size of chocolate chips). Place the sheet in an oven preheated to 190°C (375°F) for a few minutes (mine took about 9 minutes).

When the “confetti” are golden brown, remove them from the oven. Allow them to cool for a few moments and then use a spatula to remove them from the pan onto a plate.

Wash the zucchini and then cut off the peel together with a little of the pulp. Finely dice the zucchini peel, the pepper, and the celery root.

Bring the consommé to a boil, add the vegetables and let it boil for a couple of minutes. Ladle the consommé and vegetables into cups and sprinkle with the “confetti”. Serve with grated cheese, if desired. Serves 4.


the "tempestina" - ready to go in the oven 


the finished "tempestina" 


soup's on! 

Saturday, June 05, 2004

The Italian Experiment – Part I: Boston Meets Florence

Saturday, 12:30 pm: Tonight I’m cooking Italian. I’m having soup and baked beans for dinner, which isn’t very adventurous in terms of what I’m eating (no fish here), but I promise there will be adventure…

I normally cook from a recipe. I occasionally make minor modifications to suit my taste or to make due with what I have on hand, but normally I’m pretty rigid about recipes. Tonight I’m using my imagination just a little.

I was trying to think of something to go with the soup I have planned for tonight (more on that later) and somehow the idea of making Tuscan baked beans popped into my head. Actually, Tuscans have a long tradition of making baked beans. They wouldn’t make them in a New England bean pot as I am, but they would season the beans with olive oil and sage, put them in a flask, and tuck them into the fireplace embers overnight for a long slow cook.

My thought was that I would take these basic ingredients, expand on them a bit, and then cook them as I normally would cook Boston baked beans. I added some pancetta in lieu of the salt pork, and then threw in some onion, garlic and tomatoes for good measure. I put them in the oven a couple of hours ago, and already the house is filled with the wonderful smell of baking beans.

Saturday, 7:45 pm: I just finished dinner. The beans were delicious, though very soft and falling apart. I like them this way very much, but it’s interesting that they came out so different in texture from Boston baked beans. Perhaps it is due to the type of bean I used, since I normally use navy beans for Boston baked beans. My Tuscan-inspired beans had formed a really tasty sauce. I sprinkled some Parmesan cheese on top and added a little salt (I would probably increase the amount of salt in the recipe next time). All in all I was very pleased with the results!


Tuscan-Inspired Baked Beans

1 lb dry white beans (I used cannellini)
2 oz pancetta (mine was already sliced, I then cut it into ½” squares)
¼ cup olive oil
1 small onion (I used Vidalia), chopped fine
2 cloves garlic, minced
5 leaves of sage, chopped coarsely
1 cup canned Italian plum tomatoes, chopped, with juice
½ tsp salt
boiling water

Sort through the beans and remove any rocks or really ugly beans. Rinse the beans a couple of times and then cover with cold water and soak overnight.

The next morning, drain the beans and cover with fresh water. Bring to a boil and then simmer for 15 minutes. Preheat the oven to 275 F.

Meanwhile, sauté the pancetta in about 2 tbs of the olive oil over medium heat for just a minute or so, then add the onions and garlic. Continue to cook, stirring occasionally, until the onion is translucent. Stir in the sage and after a few seconds remove from the heat.

Drain the beans in a colander and then return them to the pan and stir in the pancetta mixture, tomatoes, salt, and remaining 2 tbs of olive oil. Spoon this mixture into a bean pot (or casserole dish) and add boiling water until it just covers the beans. Put them in the oven and bake for about 8 hours. Check every couple of hours to see if more water is needed. Add water for the last time about 2 hours before you intend to take the beans out of the oven.


mise en place 


ready to go in the oven 


Tuscan-Inspired Baked Beans 

Tuesday, June 01, 2004

IMBB 5

I think I'm being tested.

One of the reasons I wanted to start a blog was that I wanted to participate in Is My Blog Burning – an event where food bloggers all over the world prepare a dish in keeping with the current IMBB theme and then report on their efforts in their blogs. The themes for previous editions of IMBB were soup, tartines, cakes, and rice.

The next IMBB is June 20th and the theme is...fish.

my little kitchen


just big enough Posted by Hello